
简介
为什么要是用Easy-es
在开发的过程中,目前有原生的es的依赖,以及springboot整合es依赖可以使用,但是对于复杂的es查询场景,编写起来会比较麻烦,而Easy-es就是为了让我们编写变得更加的"easy"从而诞生的,本人在实际场景中使用。
类比于mybatis与Mybatis-plus,Mybatis-plus的封装,让我们编写查询方法更加的便捷。
官方解释
Easy-es,类似于mybatisplus,是一款基于ElasticSearch(简称Es)官方提供的RestHighLevelClient打造的ORM开发框架,在 RestHighLevelClient 的基础上,只做增强不做改变,为简化开发、提高效率而生
具体的不讲太多,主要是讲应用,详细的可以看看官网
Springboot整合Easy-es
背景案例
有个告警表、其中有字段id、主题、时间、设备号
引入依赖
        <dependency>
            <groupId>org.dromara.easy-esgroupId>
            <artifactId>easy-es-boot-starterartifactId>

            <version>2.0.0version>
        dependency>


        <dependency>
            <groupId>org.springframework.bootgroupId>
            <artifactId>spring-boot-starter-webartifactId>
            <exclusions>
                <exclusion>
                    <groupId>org.elasticsearch.clientgroupId>
                    <artifactId>elasticsearch-rest-high-level-clientartifactId>
                exclusion>
                <exclusion>
                    <groupId>org.elasticsearchgroupId>
                    <artifactId>elasticsearchartifactId>
                exclusion>
            exclusions>
        dependency>
        <dependency>
            <groupId>org.elasticsearch.clientgroupId>
            <artifactId>elasticsearch-rest-high-level-clientartifactId>
            <version>7.14.0version>
        dependency>
        <dependency>
            <groupId>org.elasticsearchgroupId>
            <artifactId>elasticsearchartifactId>
            <version>7.14.0version>
        dependency>
- 1
- 2
- 3
- 4
- 5
- 6
- 7
- 8
- 9
- 10
- 11
- 12
- 13
- 14
- 15
- 16
- 17
- 18
- 19
- 20
- 21
- 22
- 23
- 24
- 25
- 26
- 27
- 28
- 29
- 30
- 31
- 32
- 33
yaml配置
easy-es:
  enable: true #默认为true,若为false则认为不启用本框架
  address : 127.0.0.1:19200 # es的连接地址,必须含端口 若为集群,则可以用逗号隔开 例如:127.0.0.1:9200,127.0.0.2:9200
  username: elastic #若无 则可省略此行配置
  password: elastic #若无 则可省略此行配置

# 日志配置 可以查看DSL,方便验证
logging:
  level:
    tracer: trace # 开启trace级别日志,在开发时可以开启此配置,则控制台可以打印es全部请求信息及DSL语句,为了避免重复,开启此项配置后,可以将EE的print-dsl设置为false.
- 1
- 2
- 3
- 4
- 5
- 6
- 7
- 8
- 9
- 10
- 11
- 至于es的安全配置(账号密码)等可以查看往期文章
https://mp.weixin.qq.com/s/e-JgJeOLwsJGxlYGlnnnNw?token=642004887&lang=zh_CN
创建索引类/实体类
一般是在我们的数据库的实体类中使用即可
package com.walker.es.model;
import lombok.Data;
import org.dromara.easyes.annotation.IndexField;
import org.dromara.easyes.annotation.IndexId;
import org.dromara.easyes.annotation.IndexName;
import org.dromara.easyes.annotation.Settings;
import org.dromara.easyes.annotation.rely.Analyzer;
import org.dromara.easyes.annotation.rely.FieldType;
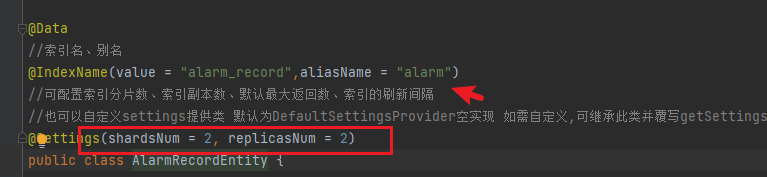
@Data
//索引名、别名
@IndexName(value = "alarm_record",aliasName = "alarm")
//可配置索引分片数、索引副本数、默认最大返回数、索引的刷新间隔
//也可以自定义settings提供类 默认为DefaultSettingsProvider空实现 如需自定义,可继承此类并覆写getSettings方法 将settings信息以Map返回
@Settings(shardsNum = 2, replicasNum = 2)
public class AlarmRecordEntity {
// 需要使用多一个id,用于标识es的id,不要跟数据库的id 混在一起,否则会无法搜索出id
@IndexId
private String esId;
// 数据库的主键id,建议与es的自动生成的id分开,命名的时候也不要取id,否则在搜索的时候会搜索不出
// 如果使用keyword和string 排序的时候 会第一个数字大的排前面,也就是9会排前面 这是有问题的
// 因此 如果数据库id的字段使用String的时候 fieldType可以使用Long
// 如果使用Long类型,则使用keyword则meiwenti
@IndexField(value = "sqlId",fieldType = FieldType.KEYWORD)
private Long sqlId;
// 需要对类型为text或keyword_tex字段聚合时,可指定其fieldData=true,否则es会报错
// 中文分词器 analyzer = Analyzer.IK_SMART, searchAnalyzer = Analyzer.IK_MAX_WORD
@IndexField(fieldType = FieldType.TEXT,fieldData = true, analyzer = Analyzer.IK_SMART, searchAnalyzer = Analyzer.IK_MAX_WORD )
private String titile;
// 日期类型
@IndexField(fieldType = FieldType.DATE, dateFormat = "yyyy-MM-dd HH:mm:ss||yyyy-MM-dd||epoch_millis")
private String time;
@IndexField(fieldType = FieldType.KEYWORD)
private String deviceCode;
// 忽略字段
@IndexField(exist = false)
private String msg;
}
- 1
- 2
- 3
- 4
- 5
- 6
- 7
- 8
- 9
- 10
- 11
- 12
- 13
- 14
- 15
- 16
- 17
- 18
- 19
- 20
- 21
- 22
- 23
- 24
- 25
- 26
- 27
- 28
- 29
- 30
- 31
- 32
- 33
- 34
- 35
- 36
- 37
- 38
- 39
- 40
- 41
- 42
- 43
- 44
- 45
- 46
- 47
- 48
这里需要注意的是sqlId的类型选择
如果选择是String,然后使用的是雪花id或者自增id,fieldType则要使用Long或者Integer类型,不能选择keyword,否则可能会导致排序出现问题
选择Long类型的话,使用keyword就没什么问题
数据库主键id注意事项:
建议不要使用id,因为作者的id,一般用于es的_id绑定一起,如果使用了,可能会导致查询id的时候无法查出数据等
如果要使用的话,得修改作者的源码部分才可。因此还是建议修改个名称万事平安了。
接口编写与测试
基础controller如下:
package com.walker.es.controller;

import com.walker.es.esmapper.AlarmRecordMapper;
import com.walker.es.model.AlarmRecordEntity;
import com.walker.es.model.Result;
import org.springframework.beans.factory.annotation.Autowired;
import org.springframework.web.bind.annotation.*;

import java.util.List;
import java.util.Optional;

@RestController
@RequestMapping("/alarm-records")
public class AlarmRecordController {

    @Autowired
    private AlarmRecordMapper alarmRecordMapper;
}
- 1
- 2
- 3
- 4
- 5
- 6
- 7
- 8
- 9
- 10
- 11
- 12
- 13
- 14
- 15
- 16
- 17
- 18
- 19
数据插入
    @PostMapping
    public Result create(@RequestBody AlarmRecordEntity alarmRecord) {
//        该方式创建索引,不会按照规则生成
        alarmRecordMapper.insert(alarmRecord);
        return Result.success();
    }
- 1
- 2
- 3
- 4
- 5
- 6
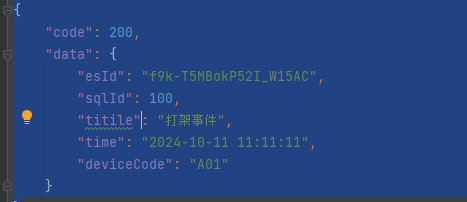
执行方法,参数如下:
{
  "sqlId": 100,
  "titile": "打架事件",
  "carNumber": "粤A001",
  "time": "2024-10-11 11:11:11",
  "deviceCode": "A01",
  "msg": ""
}
- 1
- 2
- 3
- 4
- 5
- 6
- 7
- 8
执行后结果:
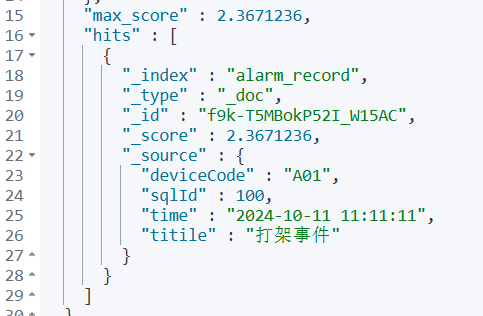
可以发现,得到的结果,与我们实体类中配置的数据并不一致
mapping也使用的是默认的
mapping中的类型和分词器也没有匹配上
所以可以发现,使用insert语句的时候,走的是默认的配置。
因此还是使用手动创建模式比较可靠一些,具体可以查看一下作者的推荐方式
手动创建索引的方式
将insert创建的索引删除,然后执行下面的方法
    @PostMapping("/createIndex")
    public Result createIndex() {
//        先删除再创建 只是为了方便演示  实际使用的时候不要这么做
        alarmRecordMapper.deleteIndex("alarm_record");
        Boolean index = alarmRecordMapper.createIndex();
        return Result.success();
    }
- 1
- 2
- 3
- 4
- 5
- 6
- 7
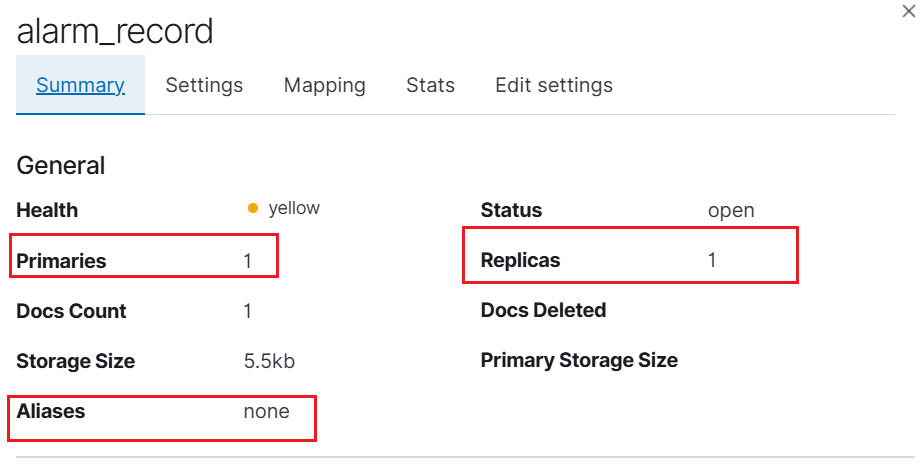
观察执行该方法后产生的索引:
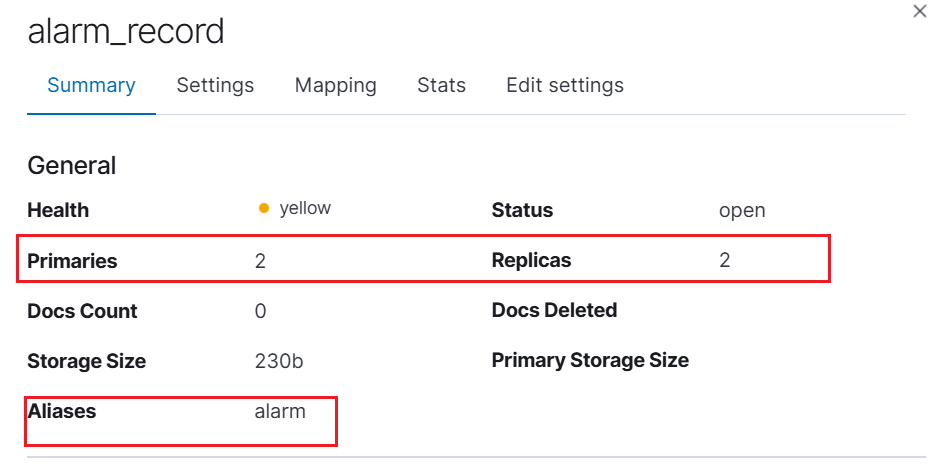
分片和副本以及别名都按照实体类中的设置进行了
- 映射配置
{
  "mapping": {
    "properties": {
      "deviceCode": {
        "type": "keyword"
      },
      "sqlId": {
        "type": "long"
      },
      "time": {
        "type": "date",
        "format": "yyyy-MM-dd HH:mm:ss||yyyy-MM-dd||epoch_millis"
      },
      "titile": {
        "type": "text",
        "analyzer": "ik_smart",
        "search_analyzer": "ik_max_word",
        "fielddata": true
      }
    }
  }
}
- 1
- 2
- 3
- 4
- 5
- 6
- 7
- 8
- 9
- 10
- 11
- 12
- 13
- 14
- 15
- 16
- 17
- 18
- 19
- 20
- 21
- 22
可以看到,生成器,字段类型等都按照我们配置的进行设置了
根据id查询
    @GetMapping("/{esId}")
    public Result getById(@PathVariable String esId) {
        AlarmRecordEntity alarmRecordEntity = alarmRecordMapper.selectById(esId);
        return Result.success(alarmRecordEntity);
    }
- 1
- 2
- 3
- 4
- 5
复制刚刚生成的_id进行
http://localhost:8080/alarm-records/f9k-T5MBokP52I_W15AC
- 1
- 不过这个查询的是根据es生成的_id进行查询
不过我们在实际的应用中,一般是查询数据库id,也就是sqlId
    @GetMapping("/query/{sqlId}")
    public Result queryBySqlId(@PathVariable String sqlId) {
        AlarmRecordEntity alarmRecordEntity = alarmRecordMapper.selectOne(new LambdaEsQueryWrapper<AlarmRecordEntity>().eq(AlarmRecordEntity::getSqlId,sqlId));
        return Result.success(alarmRecordEntity);
    }
- 1
- 2
- 3
- 4
- 5
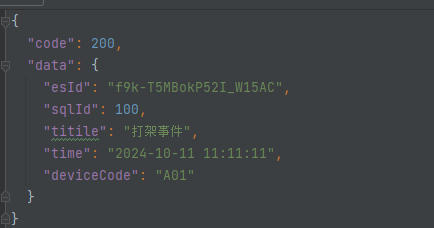
验证
http://localhost:8080/alarm-records/query/100
- 1
查询结果:
修改记录
    @PutMapping("/update")
    public Result update( @RequestBody AlarmRecordEntity alarmRecord) {
        Integer value = alarmRecordMapper.update(alarmRecord,
                new LambdaEsQueryWrapper<AlarmRecordEntity>()
                        .eq(AlarmRecordEntity::getSqlId, alarmRecord.getSqlId()));
        return Result.success(value);
    }
- 1
- 2
- 3
- 4
- 5
- 6
- 7
测试
参数:
{
    "sqlId": 100,
    "titile": "没有打架了",
    "time": "2025-10-11 11:11:11",
    "deviceCode": null
}
- 1
- 2
- 3
- 4
- 5
- 6
修改后结果:
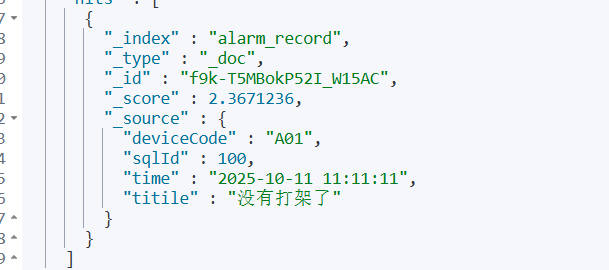
可以发现,如果是参数为null的,则不会修改
否则则会修改
删除记录
    @DeleteMapping("/delete/{sqlId}")
    public Result delete(@PathVariable String sqlId) {
        Integer res = alarmRecordMapper.delete(new LambdaEsQueryWrapper<AlarmRecordEntity>().eq(AlarmRecordEntity::getSqlId,sqlId));
        return Result.success(res);
    }
- 1
- 2
- 3
- 4
- 5
调用结果:
http://localhost:8080/alarm-records/delete/100
- 1
就会将数据给删除了
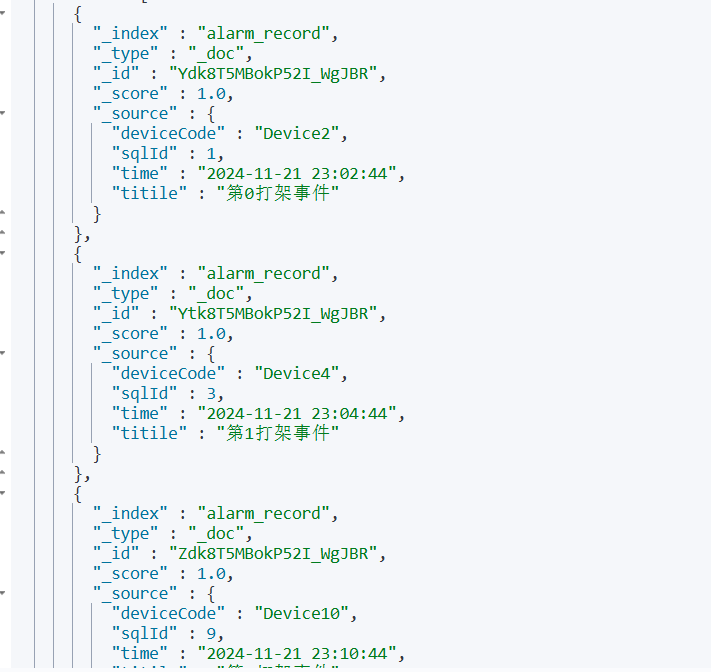
批量生成数据
用于下面分页查询使用
 @GetMapping("/makeData")
    public Result makeData(){
        List<AlarmRecordEntity> datas = new ArrayList<>();

        int k=0;
        Date date = new Date();
        for (int i = 0; i < 10; i++) {
            AlarmRecordEntity entity = new AlarmRecordEntity();
            entity.setSqlId((long) ++k);
            entity.setTitile("第"+i+"打架事件");
            entity.setDeviceCode("Device"+k);
            entity.setTime(DateUtil.offsetMinute(date,k).toString());
            datas.add(entity);
        }
        for (int i = 0; i < 10; i++) {
            AlarmRecordEntity entity = new AlarmRecordEntity();
            entity.setSqlId((long) ++k);
            entity.setTitile("第"+i+"吵架");
            entity.setDeviceCode("Device"+k);
            entity.setTime(DateUtil.offsetMinute(date,k).toString());
            datas.add(entity);
        }

        for (int i = 0; i < 10; i++) {
            AlarmRecordEntity entity = new AlarmRecordEntity();
            entity.setSqlId((long) ++k);
            entity.setTitile("第"+i+"辩论");
            entity.setDeviceCode("Device"+k);
            entity.setTime(DateUtil.offsetMinute(date,k).toString());
            datas.add(entity);
        }


        alarmRecordMapper.insertBatch(datas);
        return Result.success();
    }
- 1
- 2
- 3
- 4
- 5
- 6
- 7
- 8
- 9
- 10
- 11
- 12
- 13
- 14
- 15
- 16
- 17
- 18
- 19
- 20
- 21
- 22
- 23
- 24
- 25
- 26
- 27
- 28
- 29
- 30
- 31
- 32
- 33
- 34
- 35
- 36
生成的数据结构如下:
分页查询(重点)
在一般的业务中,会有分词查询/模糊查询,in,时间范围查询等。以及排序,分页等等
都会在该方法中进行展示
@PostMapping("/pageNotJump")
    public PageResult<AlarmRecordEntity> pageNotJump(@RequestBody SearchNotJumpForm form) {
        PageResult<AlarmRecordEntity> pageResult = new PageResult<>();

//      构件条件参数
        LambdaEsQueryWrapper<AlarmRecordEntity> wrapper = buildWrapper(form);

//        先统计数量,如果数量为0,则直接返回
        Long count = alarmRecordMapper.selectCount(wrapper);
        if(count==null) return pageResult;
        pageResult.setTotal(count);

//        如果没传,则直接跳转到首页
        if(form.getJumpType()==null){
            form.setJumpType(0);
        }

        wrapper.limit(form.getPageSize());
//        首页:倒叙排序即可
        if(form.getJumpType()==0){
            wrapper.orderByDesc(AlarmRecordEntity::getSqlId);
//         下一页: 倒叙,且sqlId小于最后一个id
        }else if(form.getJumpType()==1){
            wrapper.lt(AlarmRecordEntity::getSqlId,form.getLastId());
            wrapper.orderByDesc(AlarmRecordEntity::getSqlId);
//         上一页: 正序 sqlId>第一个id
        }else if(form.getJumpType()==2){
            wrapper.gt(AlarmRecordEntity::getSqlId,form.getLastId());
            wrapper.orderByAsc(AlarmRecordEntity::getSqlId);
//         尾页   正序
        }else if(form.getJumpType()==3){
            wrapper.orderByAsc(AlarmRecordEntity::getSqlId);
        }


        List<AlarmRecordEntity> datas = alarmRecordMapper.selectList(wrapper);
        if(CollUtil.isEmpty(datas)) {
            return pageResult;
        }

//        如果是上一页和尾页,则需要将结果根据sqlId进行倒叙排序   因为本身是使用正序排序的
        if(form.getJumpType()==2||form.getJumpType()==3){
            datas=datas.stream().sorted(Comparator.comparing(AlarmRecordEntity::getSqlId).reversed()).collect(Collectors.toList());
        }

        pageResult.setRows(datas);
        return pageResult;
    }

    private LambdaEsQueryWrapper<AlarmRecordEntity> buildWrapper(@RequestBody SearchNotJumpForm form) {
        LambdaEsQueryWrapper<AlarmRecordEntity> wrapper = new LambdaEsQueryWrapper<>();
//        title: 分词查询
//        如果是模糊查询 则使用like
        if(StrUtil.isNotEmpty(form.getTitle())){
            wrapper.match(AlarmRecordEntity::getTitile, form.getTitle());
        }

//        设备编码  eq 搜索
        if(StrUtil.isNotEmpty(form.getDeviceCode())){
            wrapper.eq(AlarmRecordEntity::getDeviceCode, form.getDeviceCode());
        }

//        id集合
        if(CollUtil.isNotEmpty(form.getIdList())){
            wrapper.in(AlarmRecordEntity::getSqlId, form.getIdList());
        }
//        时间范围
        if(StrUtil.isNotEmpty(form.getStartTime())){
            wrapper.between(AlarmRecordEntity::getTime, form.getStartTime(),form.getEndTime());
        }
        return wrapper;
    }
- 1
- 2
- 3
- 4
- 5
- 6
- 7
- 8
- 9
- 10
- 11
- 12
- 13
- 14
- 15
- 16
- 17
- 18
- 19
- 20
- 21
- 22
- 23
- 24
- 25
- 26
- 27
- 28
- 29
- 30
- 31
- 32
- 33
- 34
- 35
- 36
- 37
- 38
- 39
- 40
- 41
- 42
- 43
- 44
- 45
- 46
- 47
- 48
- 49
- 50
- 51
- 52
- 53
- 54
- 55
- 56
- 57
- 58
- 59
- 60
- 61
- 62
- 63
- 64
- 65
- 66
- 67
- 68
- 69
- 70
- 71
- 72
测试
参数:
{
    "pageIndex": 1,
    "pageSize": 5,
    "title": "打架"
}

返回结果:{
    "code": 200,
    "data": {
        "total": 10,
        "list": [
            {
                "esId": "xdldT5MBokP52I_WlJDe",
                "sqlId": 10,
                "titile": "第9打架事件",
                "time": "2024-11-21 23:45:52",
                "deviceCode": "Device10"
            },
            {
                "esId": "xNldT5MBokP52I_WlJDe",
                "sqlId": 9,
                "titile": "第8打架事件",
                "time": "2024-11-21 23:44:52",
                "deviceCode": "Device9"
            },
            {
                "esId": "w9ldT5MBokP52I_WlJDe",
                "sqlId": 8,
                "titile": "第7打架事件",
                "time": "2024-11-21 23:43:52",
                "deviceCode": "Device8"
            },
            {
                "esId": "wtldT5MBokP52I_WlJDe",
                "sqlId": 7,
                "titile": "第6打架事件",
                "time": "2024-11-21 23:42:52",
                "deviceCode": "Device7"
            },
            {
                "esId": "wdldT5MBokP52I_WlJDe",
                "sqlId": 6,
                "titile": "第5打架事件",
                "time": "2024-11-21 23:41:52",
                "deviceCode": "Device6"
            }
        ],
        "pageNum": 1,
        "pageSize": 5,
        "size": 5,
        "startRow": 0,
        "endRow": 4,
        "pages": 2,
        "prePage": 0,
        "nextPage": 2,
        "hasPreviousPage": false,
        "hasNextPage": true,
        "navigatePages": 8,
        "navigatePageNums": [
            1,
            2
        ],
        "navigateFirstPage": 1,
        "navigateLastPage": 2,
        "lastPage": false,
        "firstPage": true
    }
}
- 1
- 2
- 3
- 4
- 5
- 6
- 7
- 8
- 9
- 10
- 11
- 12
- 13
- 14
- 15
- 16
- 17
- 18
- 19
- 20
- 21
- 22
- 23
- 24
- 25
- 26
- 27
- 28
- 29
- 30
- 31
- 32
- 33
- 34
- 35
- 36
- 37
- 38
- 39
- 40
- 41
- 42
- 43
- 44
- 45
- 46
- 47
- 48
- 49
- 50
- 51
- 52
- 53
- 54
- 55
- 56
- 57
- 58
- 59
- 60
- 61
- 62
- 63
- 64
- 65
- 66
- 67
- 68
- 69
- 70
可以发现,将total总共有10条,然后按照时间倒叙排序,以及将打架相关的时间都返回了。
其他验证也都是没问题的,大家可以尝试一下
禁止跳页的方式
什么是跳页呢,就是可以选择分页,跳到指定的页数

而禁止跳页,就是不允许根据页码进行数据的查询,而是选择只有这种方式

为什么要选择禁止分页的情况呢? 不管是在mysql还是es中,跳页都需要过滤掉页码*页数的数据,在这个遍历的过程中是需要消耗时间的。
例如mysql中的 limit 10 offset 1000000 表示需要跳过1000000 数据,而在这个过程中,是需要消费时间的。
而禁止跳页,上一页,下一页的方式,就可以通过id进行排序
下面便是一个演示:
批量生成的数据总共是30条,最大的id是30,最小的id=1
我们根据结果进行验证。
验证
- 首页
//参数
{
    "jumpType": 0,
    "pageSize": 5
}

//返回结果:
{
    "rows": [
        {
            "esId": "2dldT5MBokP52I_WlJDe",
            "sqlId": 30,
            "titile": "第9辩论",
            "time": "2024-11-22 00:05:52",
            "deviceCode": "Device30"
        },
        {
            "esId": "2NldT5MBokP52I_WlJDe",
            "sqlId": 29,
            "titile": "第8辩论",
            "time": "2024-11-22 00:04:52",
            "deviceCode": "Device29"
        },
        {
            "esId": "19ldT5MBokP52I_WlJDe",
            "sqlId": 28,
            "titile": "第7辩论",
            "time": "2024-11-22 00:03:52",
            "deviceCode": "Device28"
        },
        {
            "esId": "1tldT5MBokP52I_WlJDe",
            "sqlId": 27,
            "titile": "第6辩论",
            "time": "2024-11-22 00:02:52",
            "deviceCode": "Device27"
        },
        {
            "esId": "1dldT5MBokP52I_WlJDe",
            "sqlId": 26,
            "titile": "第5辩论",
            "time": "2024-11-22 00:01:52",
            "deviceCode": "Device26"
        }
    ],
    "total": 30
}
- 1
- 2
- 3
- 4
- 5
- 6
- 7
- 8
- 9
- 10
- 11
- 12
- 13
- 14
- 15
- 16
- 17
- 18
- 19
- 20
- 21
- 22
- 23
- 24
- 25
- 26
- 27
- 28
- 29
- 30
- 31
- 32
- 33
- 34
- 35
- 36
- 37
- 38
- 39
- 40
- 41
- 42
- 43
- 44
- 45
- 46
- 47
- 下一页
点击首页后的最后一条数据sqlId是26,所以lastId=26,验证一下下一条数据是否在26之后
//参数
{
  "jumpType": 1,
  "lastId": 26,
  "pageSize": 5
}
//返回结果
{
  "rows": [
    {
      "esId": "1NldT5MBokP52I_WlJDe",
      "sqlId": 25,
      "titile": "第4辩论",
      "time": "2024-11-22 00:00:52",
      "deviceCode": "Device25"
    },
    {
      "esId": "09ldT5MBokP52I_WlJDe",
      "sqlId": 24,
      "titile": "第3辩论",
      "time": "2024-11-21 23:59:52",
      "deviceCode": "Device24"
    },
    {
      "esId": "0tldT5MBokP52I_WlJDe",
      "sqlId": 23,
      "titile": "第2辩论",
      "time": "2024-11-21 23:58:52",
      "deviceCode": "Device23"
    },
    {
      "esId": "0dldT5MBokP52I_WlJDe",
      "sqlId": 22,
      "titile": "第1辩论",
      "time": "2024-11-21 23:57:52",
      "deviceCode": "Device22"
    },
    {
      "esId": "0NldT5MBokP52I_WlJDe",
      "sqlId": 21,
      "titile": "第0辩论",
      "time": "2024-11-21 23:56:52",
      "deviceCode": "Device21"
    }
  ],
  "total": 30
}
- 1
- 2
- 3
- 4
- 5
- 6
- 7
- 8
- 9
- 10
- 11
- 12
- 13
- 14
- 15
- 16
- 17
- 18
- 19
- 20
- 21
- 22
- 23
- 24
- 25
- 26
- 27
- 28
- 29
- 30
- 31
- 32
- 33
- 34
- 35
- 36
- 37
- 38
- 39
- 40
- 41
- 42
- 43
- 44
- 45
- 46
- 47
- 上一页
我们可以在上面的接口上,返回上一页,因此lastId=25,验证返回的结果 是否是上一页的数据
参数:
{
  "jumpType": 2,
  "lastId": 25,
  "pageSize": 5
}


返回结果:
{
  "rows": [
    {
      "esId": "2dldT5MBokP52I_WlJDe",
      "sqlId": 30,
      "titile": "第9辩论",
      "time": "2024-11-22 00:05:52",
      "deviceCode": "Device30"
    },
    {
      "esId": "2NldT5MBokP52I_WlJDe",
      "sqlId": 29,
      "titile": "第8辩论",
      "time": "2024-11-22 00:04:52",
      "deviceCode": "Device29"
    },
    {
      "esId": "19ldT5MBokP52I_WlJDe",
      "sqlId": 28,
      "titile": "第7辩论",
      "time": "2024-11-22 00:03:52",
      "deviceCode": "Device28"
    },
    {
      "esId": "1tldT5MBokP52I_WlJDe",
      "sqlId": 27,
      "titile": "第6辩论",
      "time": "2024-11-22 00:02:52",
      "deviceCode": "Device27"
    },
    {
      "esId": "1dldT5MBokP52I_WlJDe",
      "sqlId": 26,
      "titile": "第5辩论",
      "time": "2024-11-22 00:01:52",
      "deviceCode": "Device26"
    }
  ],
  "total": 30
}
- 1
- 2
- 3
- 4
- 5
- 6
- 7
- 8
- 9
- 10
- 11
- 12
- 13
- 14
- 15
- 16
- 17
- 18
- 19
- 20
- 21
- 22
- 23
- 24
- 25
- 26
- 27
- 28
- 29
- 30
- 31
- 32
- 33
- 34
- 35
- 36
- 37
- 38
- 39
- 40
- 41
- 42
- 43
- 44
- 45
- 46
- 47
- 48
- 49
可以看到结果是正确的。
- 尾页
参数:
{
  "jumpType": 3,
  "pageSize": 5
}

结果:
{
  "rows": [
    {
      "esId": "wNldT5MBokP52I_WlJDe",
      "sqlId": 5,
      "titile": "第4打架事件",
      "time": "2024-11-21 23:40:52",
      "deviceCode": "Device5"
    },
    {
      "esId": "v9ldT5MBokP52I_WlJDe",
      "sqlId": 4,
      "titile": "第3打架事件",
      "time": "2024-11-21 23:39:52",
      "deviceCode": "Device4"
    },
    {
      "esId": "vtldT5MBokP52I_WlJDe",
      "sqlId": 3,
      "titile": "第2打架事件",
      "time": "2024-11-21 23:38:52",
      "deviceCode": "Device3"
    },
    {
      "esId": "vdldT5MBokP52I_WlJDe",
      "sqlId": 2,
      "titile": "第1打架事件",
      "time": "2024-11-21 23:37:52",
      "deviceCode": "Device2"
    },
    {
      "esId": "vNldT5MBokP52I_WlJDe",
      "sqlId": 1,
      "titile": "第0打架事件",
      "time": "2024-11-21 23:36:52",
      "deviceCode": "Device1"
    }
  ],
  "total": 30
}
- 1
- 2
- 3
- 4
- 5
- 6
- 7
- 8
- 9
- 10
- 11
- 12
- 13
- 14
- 15
- 16
- 17
- 18
- 19
- 20
- 21
- 22
- 23
- 24
- 25
- 26
- 27
- 28
- 29
- 30
- 31
- 32
- 33
- 34
- 35
- 36
- 37
- 38
- 39
- 40
- 41
- 42
- 43
- 44
- 45
- 46
- 47
- 48
可以看到 最后一页的数据是sqlId为1~5,符合结果的预期
这里就是禁止跳页的基础实现方式了,在实际应用的场景应该是有可能用到的。
总结
这就是Easy-es的基础使用了,先作为Easy-es使用的第一篇,后续会针对原理,以及不同的分词器、数据同步等做一个讲解,需要对你有所帮助。
如果需要源码,可以关注一下公众号,回复项目源码即可


 微信公众号
微信公众号

评论记录:
回复评论: