题目:
skywalking 服务部署与应用: 使用提供的 OpenStack 私有云平台,申请一台 centos7.9 系统的云主机,使用提供的软 件包安装 Elasticsearch 服务和 skywalking 服务,将 skywalking 的 UI 访问端口修改为 8888。 接下来再申请一台CentOS7.9的云主机,用于搭建gpmall商城应用,并配置SkyWalking Agent, 将 gpmall 的 jar 包放置探针并启动。
步骤:
node1主机:
#安装Elasticsearch
##安装java环境
yum install -y java-1.8.0-openjdk java-1.8.0-openjdk-devel
##上传elasticsearch-7.10.0-linux-x86_64.tar.gz软件包,并解压
tar -zxvf elasticsearch-7.10.0-linux-x86_64.tar.gz -C /usr/local
##创建运行ES的用户
useradd es
passwd es
##授权给新建用户es文件夹的权限
chown -R es /usr/local/elasticsearch-7.10.0/
##修改elasticsearch.yml文件
a、集群名称,需确保不同的环境中集群的名称不重复,否则节点可能会连接到错误的集群上
cluster.name: my-application
b、节点名称,默认情况下当节点启动时Elasticsearch将随机在一份3000个名字的列表中随机指定一个。如果机器上只允许运行一个集群Elasticsearch节点,可以用${HOSTNAME}设置节点的名称为主机节点。节点默认名称为机器的主机名。
node.name: node-1
c、网络设置,绑定服务到指定IP(提供服务的网口)
network.host: 192.168.100.50
http.port: 9200
d、集群主节点信息
cluster.initial_master_nodes: [“node-1”]
##设置内核参数。
vi /etc/sysctl.conf
vm.max_map_count=262144
sysctl -p #执行命令sysctl -p生效
##配置当前用户每个进程最大同时打开文件数
vi /etc/security/limits.conf
* soft nofile 65536
* hard nofile 65536
##断开终端重新连接
##切换es用户
##启动
cd /usr/local/software/elasticsearch-7.10.0/bin
./elasticsearch -d
#安装skywalking
##上传软件包apache-skywalking-apm-es7-8.0.0.tar.gz,并解压
##修改application.yml文件
#集群配置使用单机版
cluster:
selector: ${SW_CLUSTER:standalone}
standalone:
…
#数据库使用elasticsearch7
storage:
selector: ${SW_STORAGE:elasticsearch7}
…
elasticsearch7:
nameSpace: ${SW_NAMESPACE:""}
clusterNodes: ${SW_STORAGE_ES_CLUSTER_NODES:192.168.100.50:9200}
##启动OAP服务
[root@node1 apache-skywalking-apm-bin-es7]# ./bin/oapService.sh
##部署SkyWalking UI服务,修改端口为8888
server:
port: 8888
##启动SkyWalking UI服务:
[root@node1 apache-skywalking-apm-bin-es7]# ./bin/webappService.sh
##查看是否开启11800与12800和8888端口
netstat -natpl
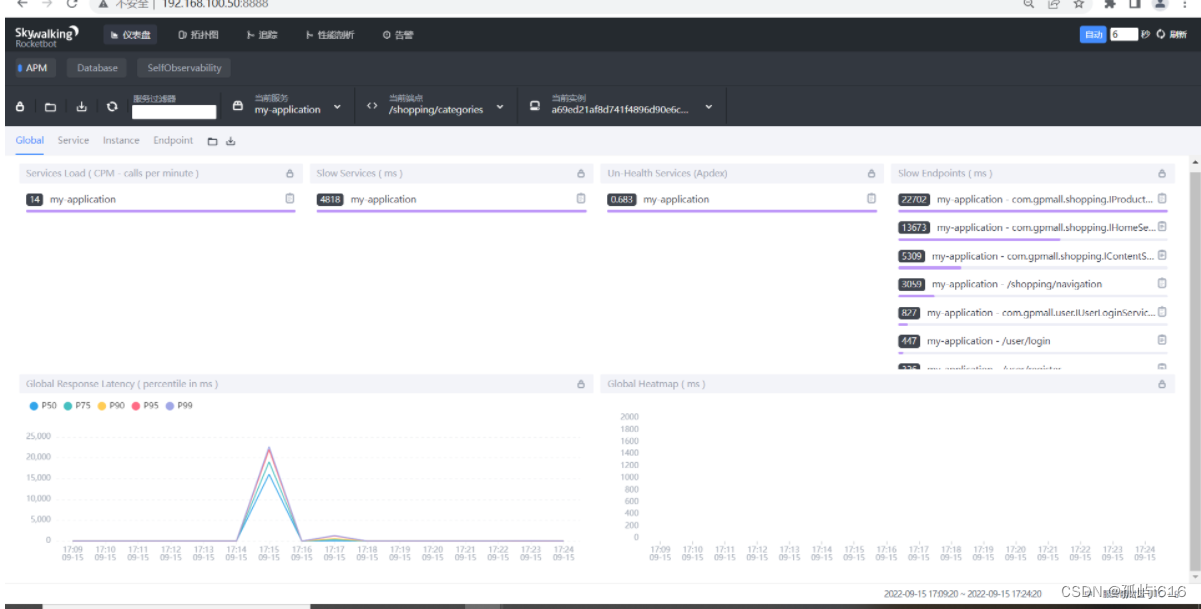
##浏览器访问IP:8888
mall主机:
#修改主机名为mall
hostnamectl set-hostname mall
#修改hosts文件
vi /etc/hosts
192.168.100.50 mall
#安装java环境
yum install -y java-1.8.0-openjdk java-1.8.0-openjdk-devel
java -version
#安装redis
yum install redis -y
#安装nginx
yum install nginx -y
#安装数据库mariadb
yum install mariadb mariadb-server -y
#安装zookeeper
tar -zxvf zookeeper-3.4.14.tar.gz -C /root/
#进入到zookeeper-3.4.14/conf目录下,将zoo_sample.cfg文件重命名为zoo.cfg,命令如下:
cd /root/zookeeper-3.4.14/conf/
mv zoo_sample.cfg zoo.cfg
#进入到zookeeper-3.4.14/bin目录下,启动ZooKeeper服务,命令如下:
cd ../bin
./zkServer.sh start
#查看ZooKeeper状态,命令如下:
./zkServer.sh status
#安装kafka
#安装Kafka服务,将提供的kafka_2.11-1.1.1.tgz解压至/root目录下,命令如下:
tar -zxvf /root/gpmall/kafka_2.11-1.1.1.tgz -C /root
#进入到kafka_2.11-1.1.1/bin目录下,启动Kafka服务,命令如下:
cd /root/kafka_2.11-1.1.1/bin/
./kafka-server-start.sh -daemon ../config/server.properties
#使用jps或者netstat -ntpl命令查看Kafka是否成功启动,命令如下:
[root@mall bin]# jps
6039 Kafka
1722 QuorumPeerMain
6126 Jps
#启动数据库服务
修改/etc/my.cnf文件,添加字段如下所示:
[root@mall ~]# vi /etc/my.cnf
[mysqld]
…
init_connect='SET collation_connection = utf8_unicode_ci'
init_connect='SET NAMES utf8'
character-set-server=utf8
collation-server=utf8_unicode_ci
skip-character-set-client-handshake
#启动数据库命令如下
systemctl start mariadb
#设置root用户的密码为123456并登录。
[root@mall ~]# mysqladmin -uroot password 123456
[root@mall ~]# mysql -uroot -p123456
Welcome to the MariaDB monitor. Commands end with ; or \g.
Your MariaDB connection id is 3
Server version: 5.5.68-MariaDB MariaDB Server
Copyright (c) 2000, 2018, Oracle, MariaDB Corporation Ab and others.
Type 'help;' or '\h' for help. Type '\c' to clear the current input statement.
MariaDB [(none)]>
#设置root用户的权限,命令如下:
MariaDB [(none)]> grant all privileges on *.* to root@localhost identified by '123456' with grant option;
Query OK, 0 rows affected (0.001 sec)
MariaDB [(none)]> grant all privileges on *.* to root@"%" identified by '123456' with grant option;
Query OK, 0 rows affected (0.001 sec)
#创建数据库gpmall并导入/root/gpmall/目录中的gpmall.sql文件。
MariaDB [(none)]> create database gpmall;
Query OK, 1 row affected (0.00 sec)
MariaDB [(none)]> use gpmall;
MariaDB [gpmall]> source /root/gpmall/gpmall.sql
#退出数据库并设置开机自启。
MariaDB [gpmall]> exit
#设置数据库开机自启
systemctl enable mariadb
#启动redis
#修改Redis配置文件,编辑/etc/redis.conf文件。将bind 127.0.0.1这一行注释掉;将protected-mode yes 改为 protected-mode no
[root@mall ~]# systemctl start redis
[root@mall ~]# systemctl enable redis
#启动nginx
[root@mall ~]# systemctl start nginx
[root@mall ~]# systemctl enable nginx
#全局变量配置(删除原有的192.168.100.60 mall)
[root@mall ~]# cat /etc/hosts
127.0.0.1 localhost localhost.localdomain localhost4 localhost4.localdomain4
::1 localhost localhost.localdomain localhost6 localhost6.localdomain6
192.168.100.60 redis.mall
192.168.100.60 kafka.mall
192.168.100.60 mysql.mall
192.168.100.60 zookeeper.mall
#部署前端
[root@mall ~]# rm -rf /usr/share/nginx/html/*
[root@mall ~]# cp -rvf gpmall/dist/* /usr/share/nginx/html/
#修改Nginx配置文件/etc/nginx/nginx.conf,添加映射如下所示:
[root@mall ~]# vi /etc/nginx/conf.d/default.conf
server {
listen 80;
server_name localhost;
#charset koi8-r;
#access_log /var/log/nginx/host.access.log main;
location / {
root /usr/share/nginx/html;
index index.html index.htm;
}
location /user{
proxy_pass http://127.0.0.1:8082;
}
location /shopping{
proxy_pass http://127.0.0.1:8081;
}
location /cashier{
proxy_pass http://127.0.0.1:8083;
}
}
#重启Nginx服务,命令如下
[root@mall ~]# systemctl restart nginx
到此,前端部署完毕。
#部署后端
#将node-1节点的/opt/apache-skywalking-apm-bin-es7目录下的agent目录复制到mall节点下:
scp -r agent/ [email protected]:/root/
#修改SkyWalking agent配置文件:
[root@mall ~]# vi agent/config/agent.config
…
agent.service_name=${SW_AGENT_NAME:my-application}
agent.sample_n_per_3_secs=${SW_AGENT_SAMPLE:1}
…
collector.backend_service=${SW_AGENT_COLLECTOR_BACKEND_SERVICES:192.168.100.50:11800}
#采样率修改:agent.sample_n_per_3_secs配置说明:在访问量较少时,链路全量收集不会对系统带来太大负担,能够完整的观测到系统的运行状况。但是在访问量较大时,全量的链路收集,对链路收集的客户端(agent探针)、服务端(SkyWalking OAP)、存储器(例如说Elastcsearch)都会带来较大的性能开销,甚至会影响应用的正常运行。在访问量级较大的情况下,往往会选择抽样采样,只收集部分链路信息。SkyWalking Agent在agent/config/agent.config 配置文件中,定义了agent.sample_n_per_3_secs配置项,设置每3秒可收集的链路数据的数量
#将gpmall软件包中提供的4个jar包,放置探针并启动,通过设置启动参数的方式检测系统,启动命令如下:
[root@mall ~]# nohup java -javaagent:/root/agent/skywalking-agent.jar -jar gpmall/shopping-provider-0.0.1-SNAPSHOT.jar &
[1] 20086
[root@mall ~]# nohup: ignoring input and appending output to ‘nohup.out’
[root@mall ~]# nohup java -javaagent:/root/agent/skywalking-agent.jar -jar gpmall/user-provider-0.0.1-SNAPSHOT.jar &
[2] 20132
[root@mall ~]# nohup: ignoring input and appending output to ‘nohup.out’
[root@mall ~]# nohup java -javaagent:/root/agent/skywalking-agent.jar -jar gpmall/gpmall-shopping-0.0.1-SNAPSHOT.jar &
[3] 20177
[root@mall ~]# nohup: ignoring input and appending output to ‘nohup.out’
[root@mall ~]# nohup java -javaagent:/root/agent/skywalking-agent.jar -jar gpmall/gpmall-user-0.0.1-SNAPSHOT.jar &
[4] 20281
[root@mall ~]# nohup: ignoring input and appending output to ‘nohup.out’
# httpd访问网络配置
[root@mall ~]# setsebool -P httpd_can_network_connect 1
访问:


评论记录:
回复评论: