
大家好,今天我要和大家分享一个 Java 多线程开发中很实用但不太被重视的技巧 - 如何在线程池运行过程中动态调整核心线程数。这个能力在系统负载动态变化的场景下特别有用,能帮我们实现更灵活的资源调配。
一、核心问题:线程池核心线程数能否运行时修改?
先直接回答:能! ThreadPoolExecutor 确实支持在运行时动态修改核心线程数。
Java 中的 ThreadPoolExecutor 类提供了setCorePoolSize(int corePoolSize)方法,允许我们在线程池运行过程中修改核心线程数。这个功能非常实用,但很多开发者并不知道或者不确定如何正确使用它。
二、线程池基础知识回顾
在深入讨论前,我们先快速回顾一下线程池的基本概念:
Java 线程池中几个关键参数:
- corePoolSize: 核心线程数,线程池会一直保持这些线程活跃
- maximumPoolSize: 最大线程数,线程池可以创建的最大线程数量
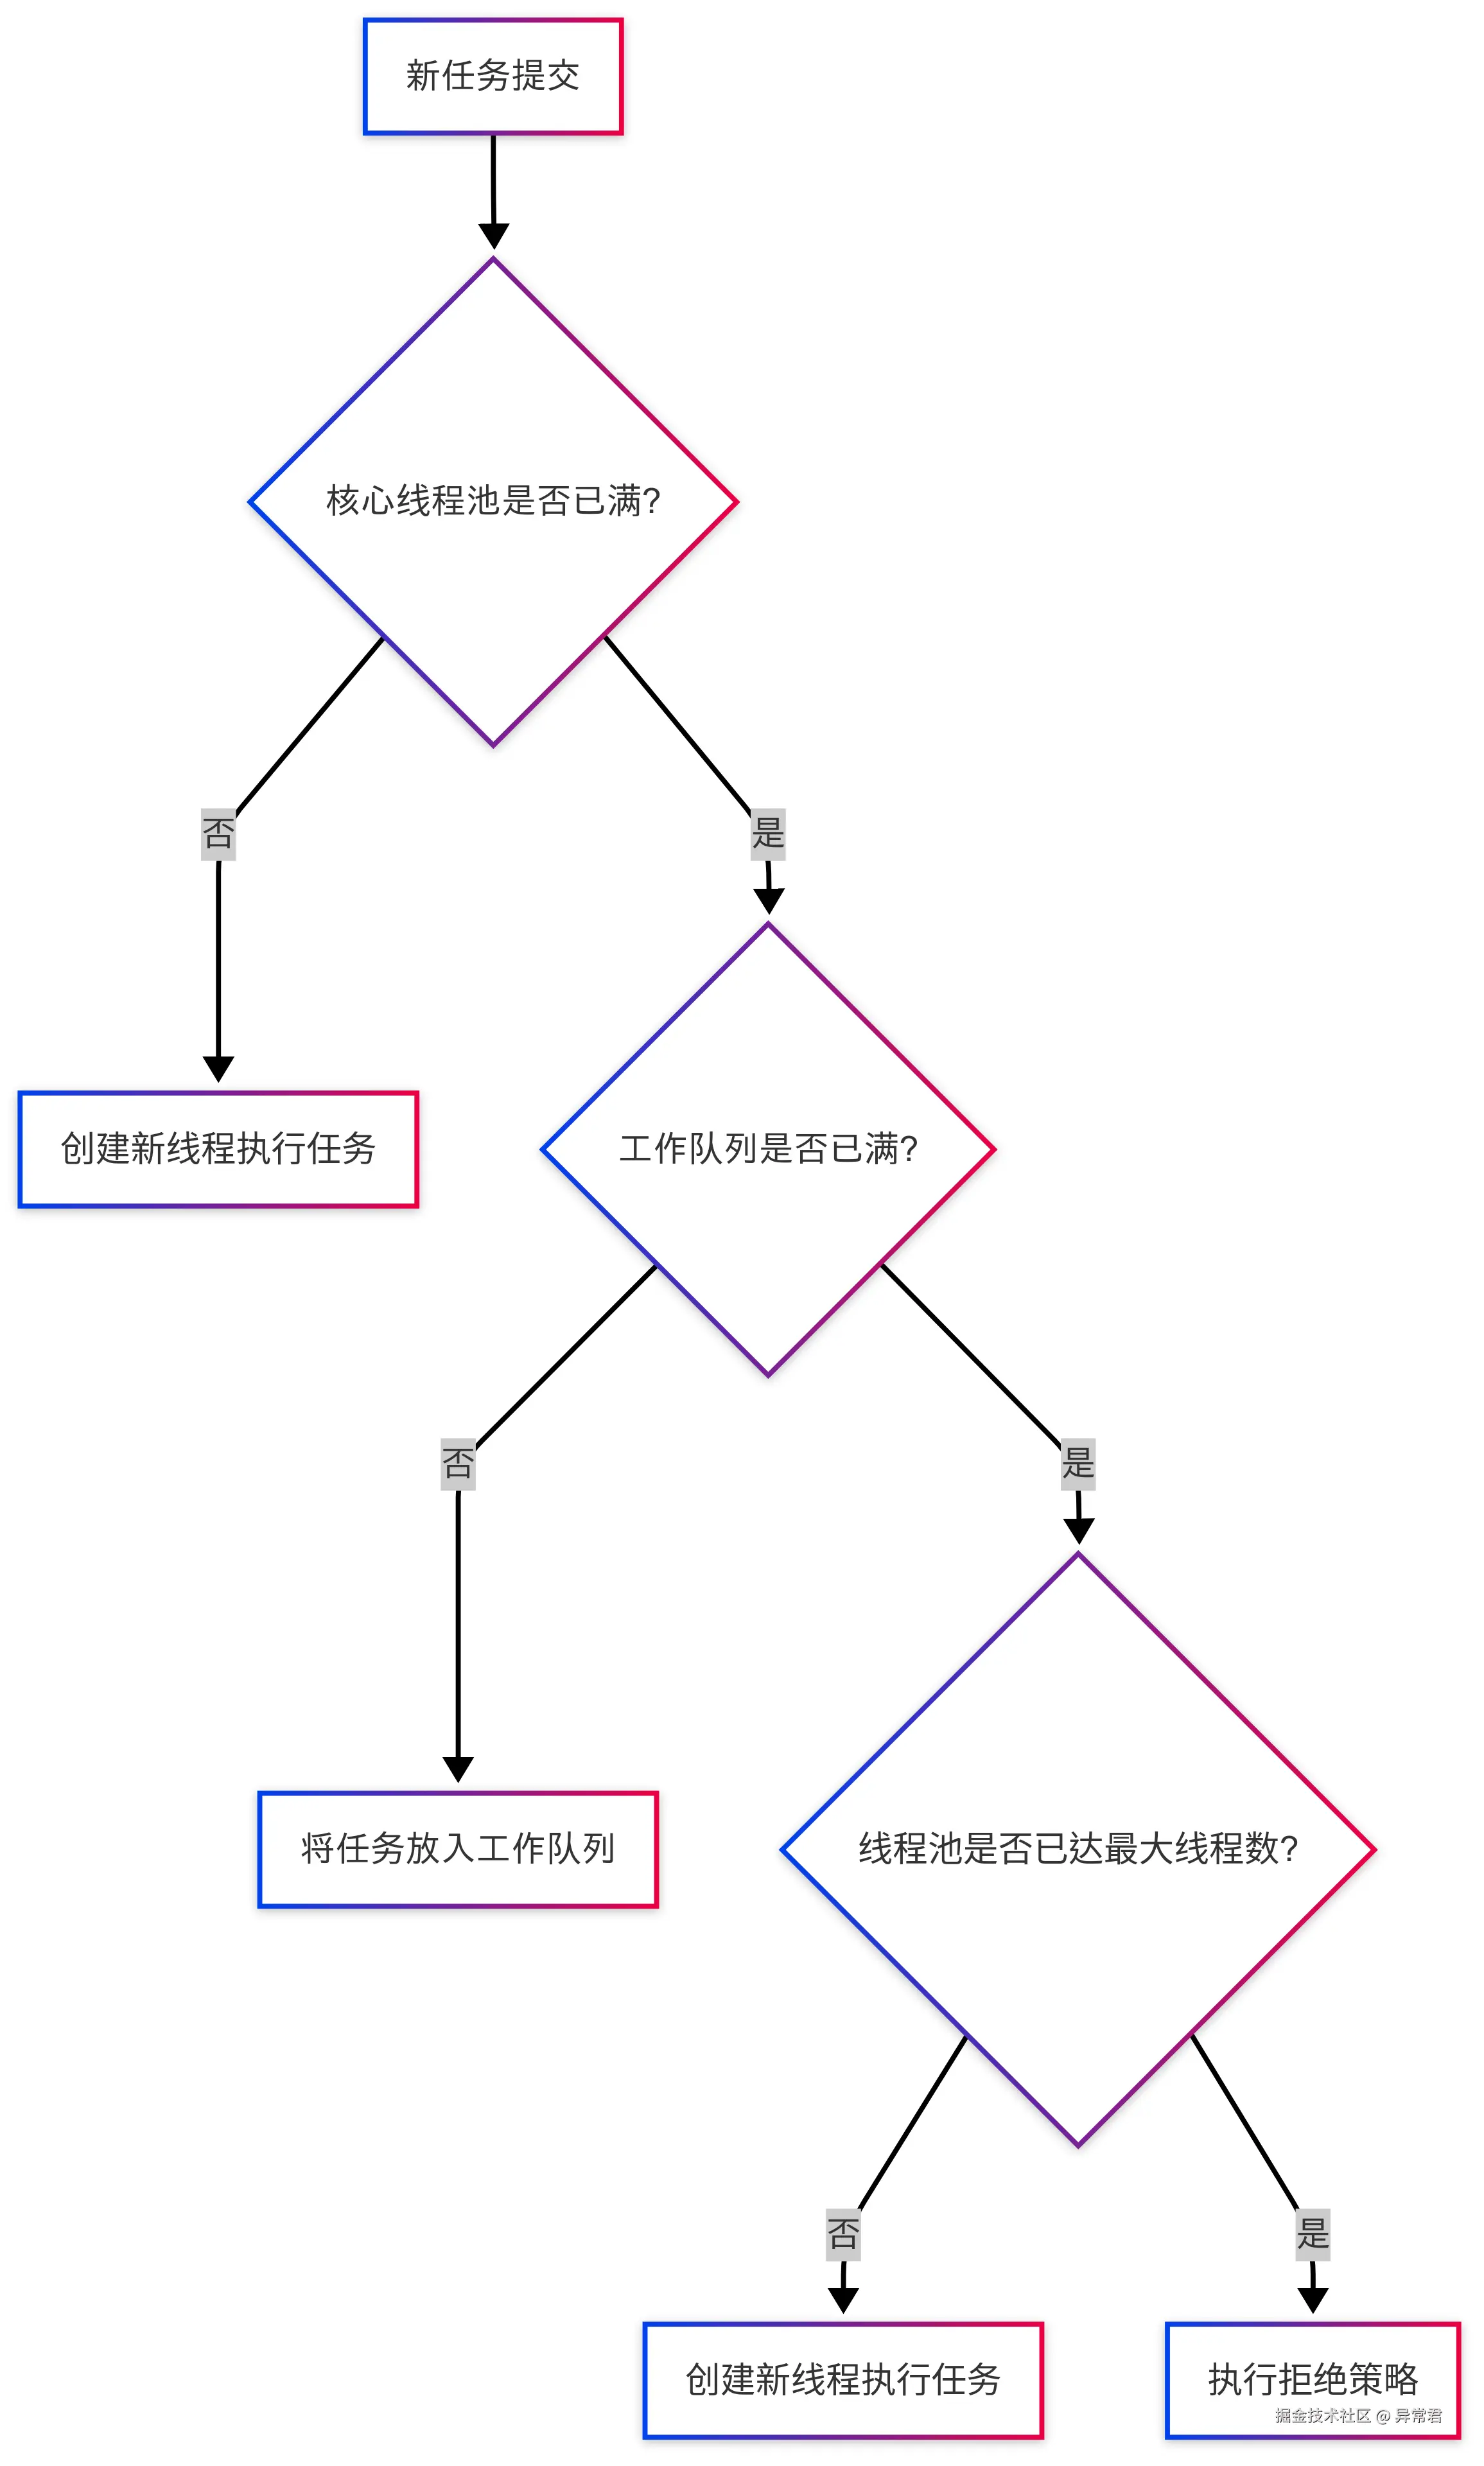
- workQueue: 工作队列,当所有核心线程都在工作时,新任务会放在这里等待
- keepAliveTime: 非核心线程的空闲存活时间
线程池状态与核心线程数调整的关系
ThreadPoolExecutor 内部维护着一个状态变量,定义了线程池的几种关键状态:

在不同状态下调整核心线程数的行为:
- RUNNING:正常运行状态,可以完全接受
setCorePoolSize的调整 - SHUTDOWN:不再接受新任务,但会处理队列中的任务。此时仍可以调用
setCorePoolSize,但不会创建新的线程 - STOP:不接受新任务,也不处理队列任务,中断正在执行的任务。此时调用
setCorePoolSize无实际效果 - TIDYING/TERMINATED:调用
setCorePoolSize无效
队列类型对线程池行为的影响
线程池使用的队列类型对其行为有重大影响:
-
无界队列(如
LinkedBlockingQueue无参构造):队列理论上无容量限制,会导致maximumPoolSize参数实际上被忽略,因为队列永远不会满,线程池不会创建超过核心线程数的线程。此时,动态调整核心线程数是控制并发的唯一手段。 -
有界队列(如
ArrayBlockingQueue或指定容量的LinkedBlockingQueue):当队列满时,线程池会创建新线程直到达到最大线程数,此时核心线程数和最大线程数都能影响线程池行为。
java 代码解读复制代码// 无界队列示例 - maximumPoolSize实际不起作用
ThreadPoolExecutor unboundedPoolExecutor = new ThreadPoolExecutor(
        5, 10, 60, TimeUnit.SECONDS,
        new LinkedBlockingQueue<>());  // 无界队列

// 有界队列示例 - 可以用到maximumPoolSize
ThreadPoolExecutor boundedPoolExecutor = new ThreadPoolExecutor(
        5, 10, 60, TimeUnit.SECONDS,
        new LinkedBlockingQueue<>(100));  // 有界队列,容量100
三、动态修改核心线程数的方法
1. 基本用法
java 代码解读复制代码import java.util.concurrent.LinkedBlockingQueue;
import java.util.concurrent.ThreadPoolExecutor;
import java.util.concurrent.TimeUnit;

public class ThreadPoolCoreModifyDemo {
    public static void main(String[] args) {
        // 创建线程池,初始核心线程数为2,最大线程数为5
        ThreadPoolExecutor executor = new ThreadPoolExecutor(
                2,
                5,
                60, TimeUnit.SECONDS,
                new LinkedBlockingQueue<>(10));

        System.out.println("初始核心线程数: " + executor.getCorePoolSize());

        // 修改核心线程数为4
        executor.setCorePoolSize(4);

        System.out.println("修改后核心线程数: " + executor.getCorePoolSize());

        // 关闭线程池
        executor.shutdown();
    }
}
就是这么简单!通过setCorePoolSize()方法,我们能在运行时随时调整线程池的核心线程数。
2. 动态调整实战案例
下面看一个更完整的例子,展示如何根据系统负载动态调整核心线程数:
java 代码解读复制代码import java.util.concurrent.*;
import java.util.concurrent.atomic.AtomicInteger;

public class DynamicThreadPoolDemo {
    public static void main(String[] args) throws InterruptedException {
        // 创建线程池,初始核心线程数为2
        ThreadPoolExecutor executor = new ThreadPoolExecutor(
                2,
                10,
                60, TimeUnit.SECONDS,
                new LinkedBlockingQueue<>(100),
                new ThreadFactory() {
                    private final AtomicInteger counter = new AtomicInteger(1);
                    @Override
                    public Thread newThread(Runnable r) {
                        return new Thread(r, "工作线程-" + counter.getAndIncrement());
                    }
                },
                new ThreadPoolExecutor.CallerRunsPolicy());

        // 预热线程池,让核心线程提前创建出来
        executor.prestartAllCoreThreads();
        System.out.println("初始核心线程数: " + executor.getCorePoolSize());
        System.out.println("当前活跃线程数: " + executor.getActiveCount());

        // 模拟低负载阶段 - 提交5个任务
        submitTasks(executor, 5, "低负载任务");
        Thread.sleep(2000);
        System.out.println("低负载阶段 - 活跃线程数: " + executor.getActiveCount());

        // 模拟高负载来临 - 先增加核心线程数
        System.out.println("\n⚠️ 检测到高负载,将核心线程数从2调整到5");
        executor.setCorePoolSize(5);
        System.out.println("调整后核心线程数: " + executor.getCorePoolSize());

        // 预热新增的核心线程
        executor.prestartAllCoreThreads();
        System.out.println("当前活跃线程数: " + executor.getActiveCount());

        // 模拟高负载阶段 - 提交20个任务
        submitTasks(executor, 20, "高负载任务");
        Thread.sleep(2000);
        System.out.println("高负载阶段 - 活跃线程数: " + executor.getActiveCount());

        // 模拟负载下降 - 减少核心线程数
        System.out.println("\n⚠️ 检测到负载下降,将核心线程数从5调整回3");
        executor.setCorePoolSize(3);
        System.out.println("调整后核心线程数: " + executor.getCorePoolSize());

        // 等待任务处理完毕
        Thread.sleep(5000);
        System.out.println("负载下降后 - 活跃线程数: " + executor.getActiveCount());

        // 关闭线程池
        executor.shutdown();
        executor.awaitTermination(10, TimeUnit.SECONDS);
    }

    private static void submitTasks(ThreadPoolExecutor executor, int count, String prefix) {
        System.out.println("提交" + count + "个" + prefix + "任务...");
        for (int i = 1; i <= count; i++) {
            final int taskId = i;
            executor.submit(() -> {
                try {
                    System.out.println(Thread.currentThread().getName() + " 执行" + prefix + "-" + taskId);
                    // 模拟任务执行时间
                    Thread.sleep(1000);
                } catch (InterruptedException e) {
                    Thread.currentThread().interrupt();
                }
                return taskId;
            });
        }
    }
}
这个例子模拟了一个真实场景:系统检测到负载变化,动态调整线程池核心线程数以适应不同的工作量。
3. prestartAllCoreThreads 方法的关键作用
在上面的例子中,我们使用了prestartAllCoreThreads()方法,这个方法有什么特别之处?
- 提前创建线程:该方法会立即创建所有核心线程,而不是等待任务提交时才按需创建
- 避免冷启动延迟:首次提交任务时不需要等待线程创建,立即处理
- 动态调整后的预热:当我们增加核心线程数后,调用此方法能立即创建新增的核心线程,即使队列中没有等待的任务
- 适用场景:系统启动时、负载预期即将上升时、核心线程数调整后
java 代码解读复制代码// 示例:增加核心线程数后立即创建线程的效果
ThreadPoolExecutor executor = new ThreadPoolExecutor(
        2, 10, 60, TimeUnit.SECONDS, new LinkedBlockingQueue<>(100));

// 初始预热 - 创建2个核心线程
int prestarted = executor.prestartAllCoreThreads();
System.out.println("预热创建线程数: " + prestarted);  // 输出: 2

// 增加核心线程数
executor.setCorePoolSize(5);

// 再次预热 - 只会创建新增的3个核心线程
prestarted = executor.prestartAllCoreThreads();
System.out.println("第二次预热创建线程数: " + prestarted);  // 输出: 3
四、核心线程数修改的内部机制
当我们调用setCorePoolSize()时,线程池内部会发生什么呢?让我们看看这个过程:
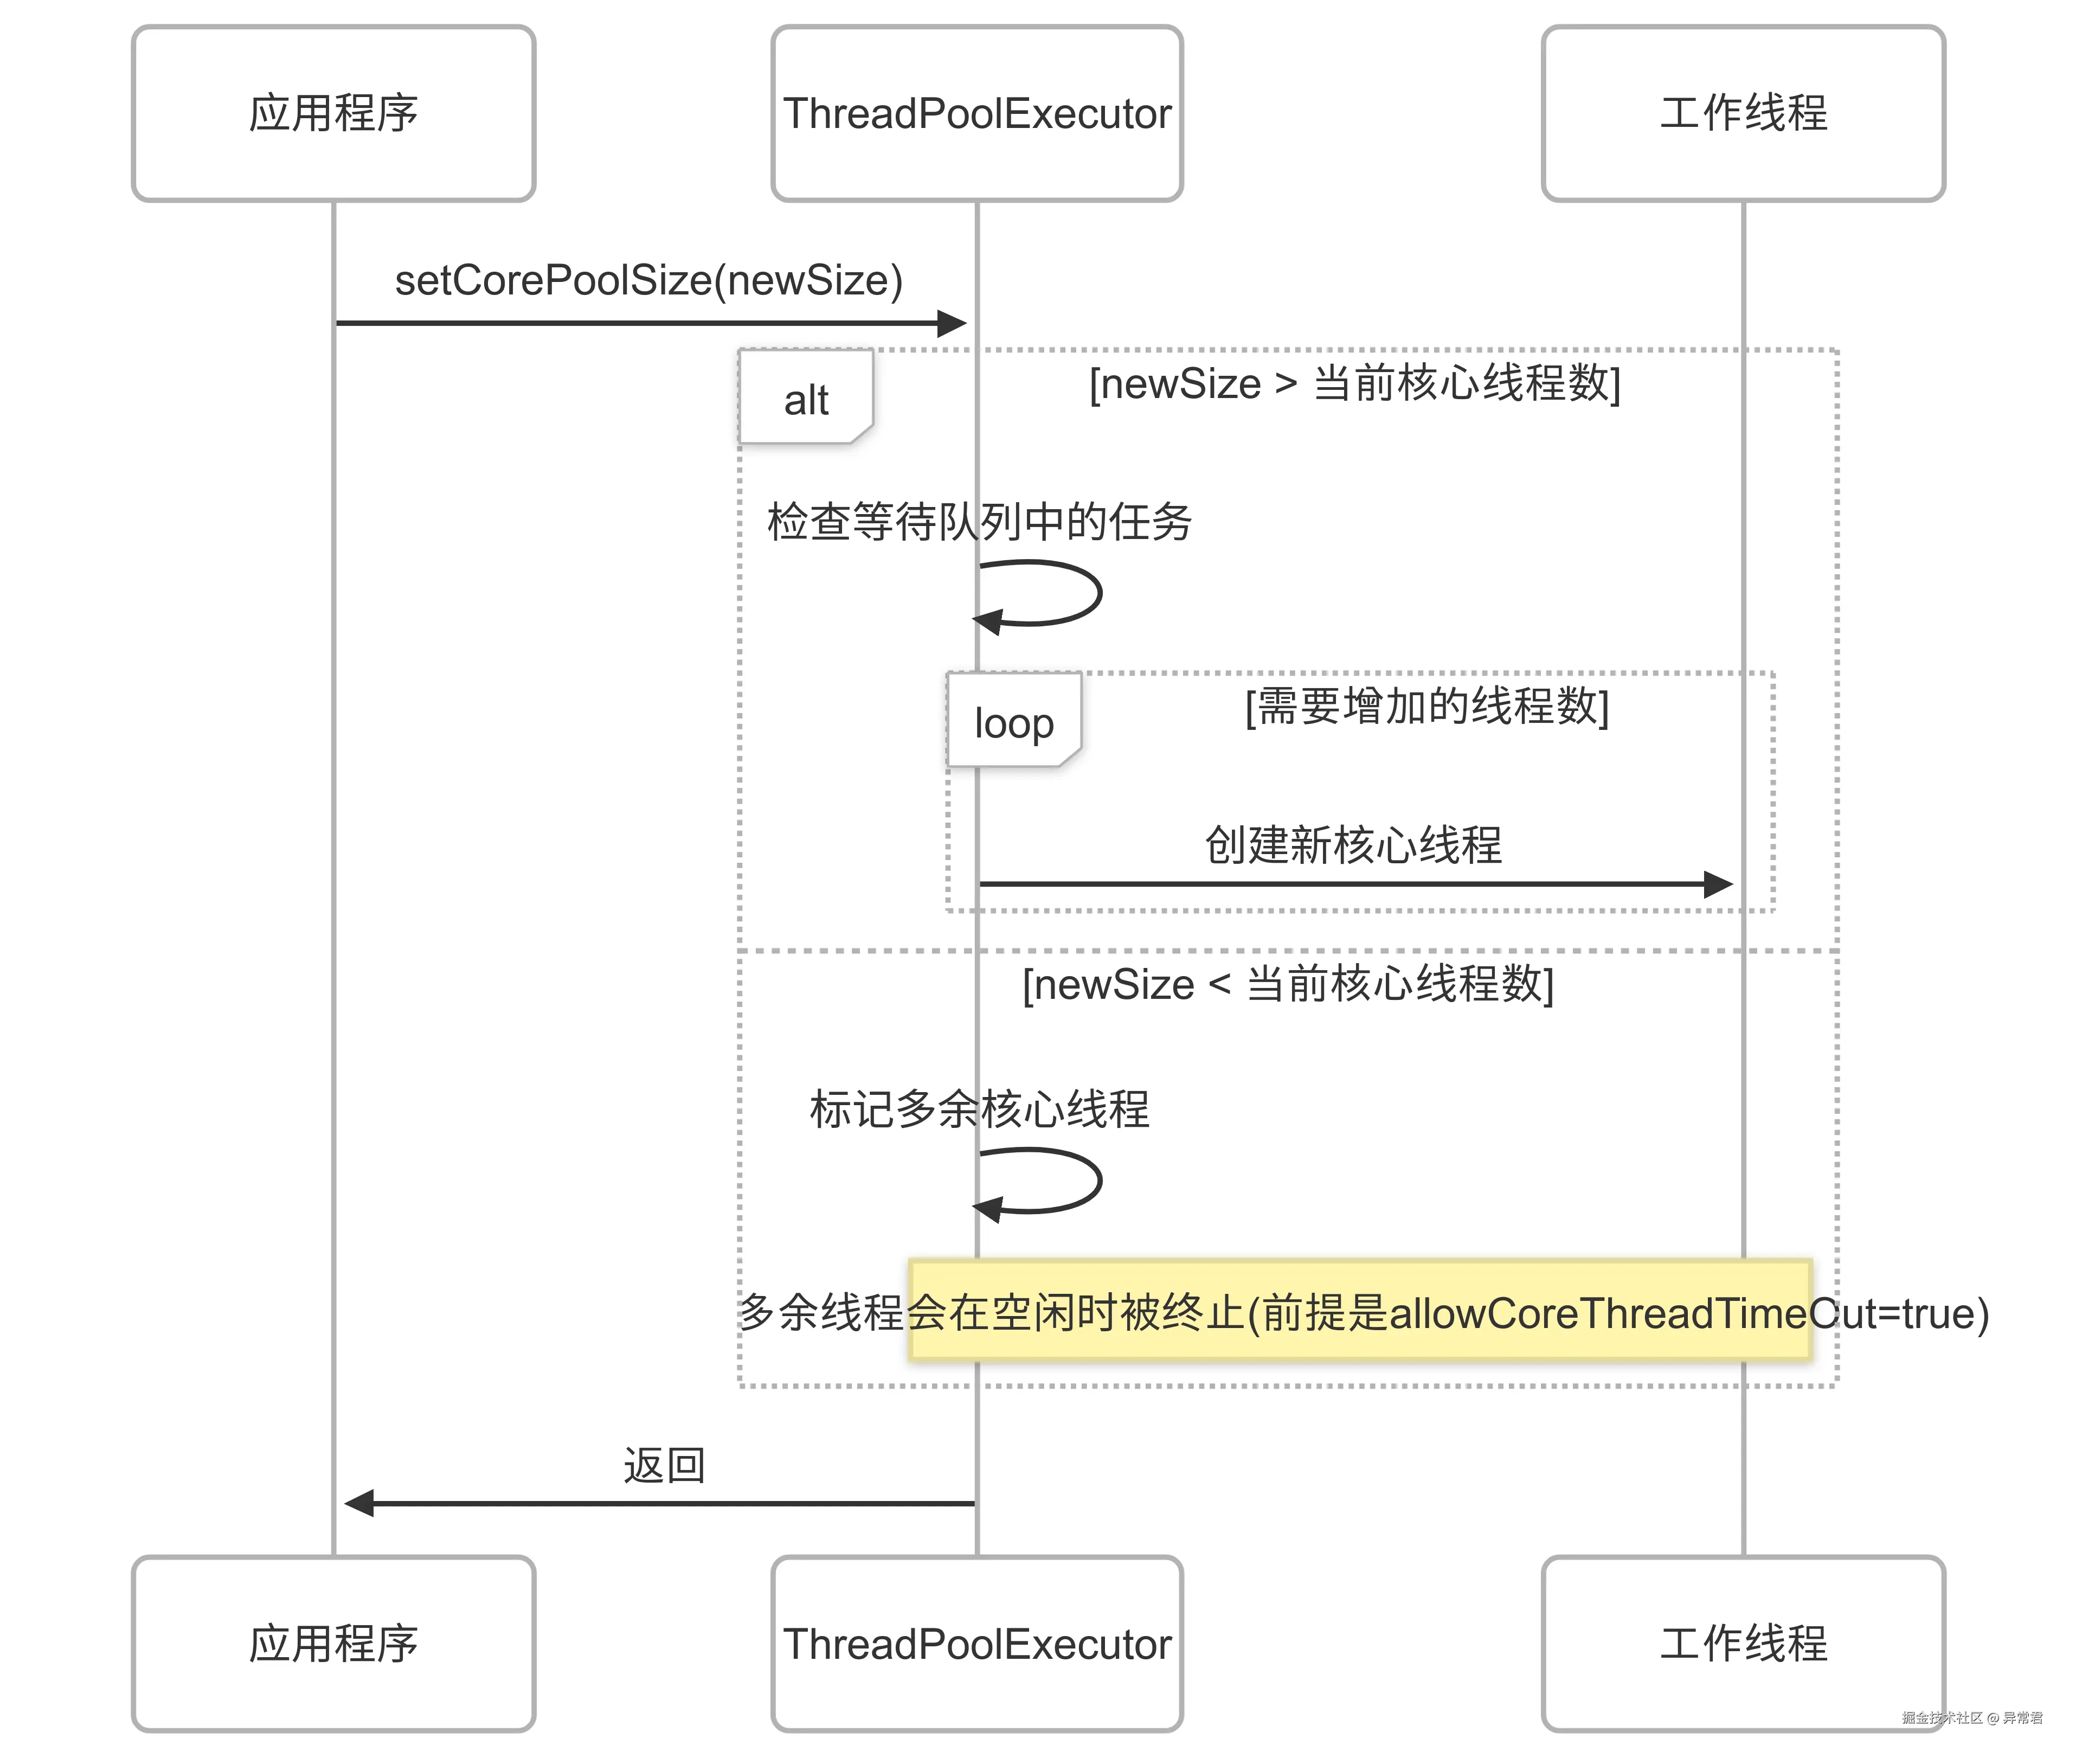
理解这个机制很重要:
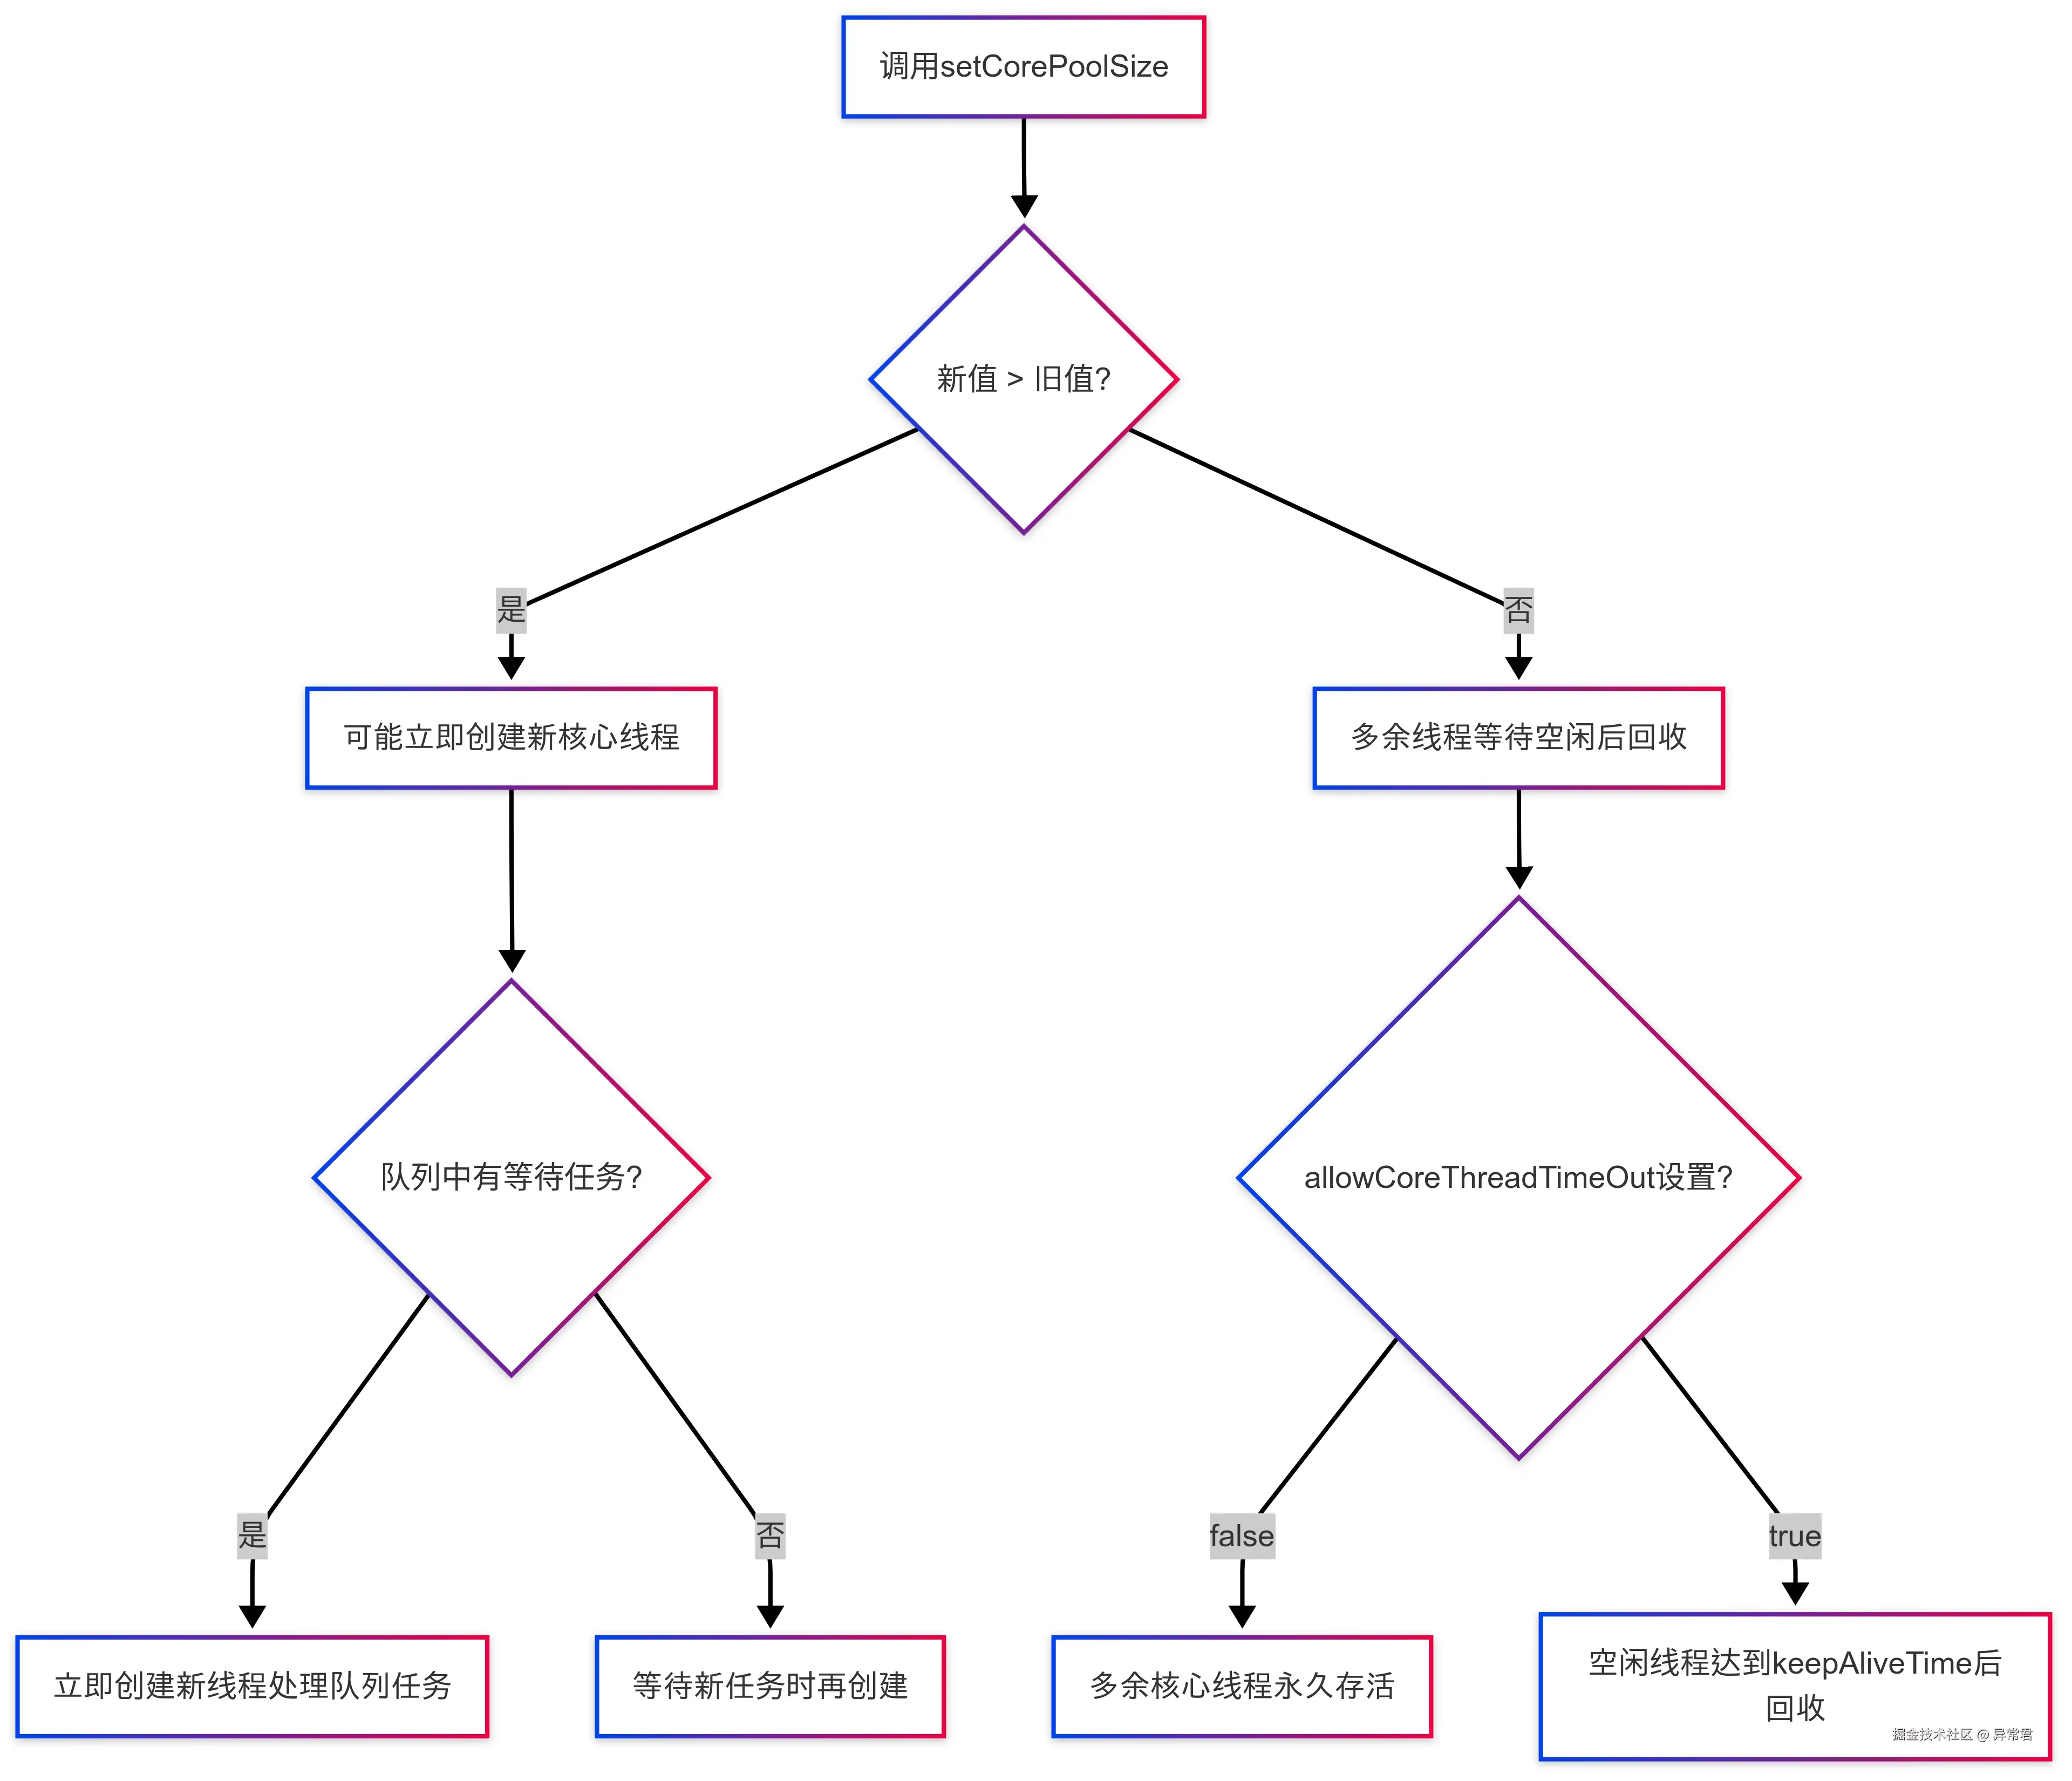
-
增加核心线程数:线程池会立即检查等待队列,如果有等待的任务,会立即创建新的核心线程来处理;如果没有等待任务,则不会立即创建新线程,而是在新任务到来时再创建。
-
减少核心线程数:线程池不会立即终止多余的核心线程,而是将它们标记为"可回收"。重要的是,默认情况下(
allowCoreThreadTimeOut(false))核心线程不会因空闲而被回收,即使核心线程数被调低,多余的核心线程会一直存活。只有设置executor.allowCoreThreadTimeOut(true)后,核心线程才会在空闲超过keepAliveTime时被回收。
java 代码解读复制代码// 允许核心线程超时回收示例
ThreadPoolExecutor executor = new ThreadPoolExecutor(5, 10,
        60, TimeUnit.SECONDS, new LinkedBlockingQueue<>(100));

// 设置核心线程也可以超时回收
executor.allowCoreThreadTimeOut(true);

// 此时即使是核心线程,空闲60秒后也会被回收
// 降低核心线程数后,多余的线程会在空闲后被清理
setCorePoolSize 的线程安全性
虽然ThreadPoolExecutor类本身是线程安全的,setCorePoolSize方法也是线程安全的,但在系统中并发调整核心线程数仍需要注意:
java 代码解读复制代码// 并发调整核心线程数的潜在问题
public class ConcurrentAdjustmentDemo {
    public static void main(String[] args) {
        ThreadPoolExecutor executor = new ThreadPoolExecutor(
                5, 20, 60, TimeUnit.SECONDS, new LinkedBlockingQueue<>(100));

        // 并发调整示例 - 可能导致意外结果
        new Thread(() -> {
            executor.setCorePoolSize(8);  // 线程1调整到8
            System.out.println("线程1调整后: " + executor.getCorePoolSize());
        }).start();

        new Thread(() -> {
            executor.setCorePoolSize(3);  // 线程2调整到3
            System.out.println("线程2调整后: " + executor.getCorePoolSize());
        }).start();

        // 最终结果取决于哪个线程后执行,可能是3也可能是8
    }
}
建议的解决方案:
java 代码解读复制代码// 通过同步机制或单线程调度器控制核心线程数调整
public class SafeAdjustmentDemo {
    private static final Object adjustLock = new Object();
    private static final ThreadPoolExecutor executor = new ThreadPoolExecutor(
            5, 20, 60, TimeUnit.SECONDS, new LinkedBlockingQueue<>(100));

    // 方法1:使用同步锁
    public static void adjustCorePoolSizeSafely(int newSize) {
        synchronized (adjustLock) {
            System.out.println("调整核心线程数: " + executor.getCorePoolSize() + " -> " + newSize);
            executor.setCorePoolSize(newSize);
        }
    }

    // 方法2:使用单线程调度器(推荐)
    private static final ScheduledExecutorService adjuster =
            Executors.newSingleThreadScheduledExecutor();

    public static void scheduleAdjustment(int newSize) {
        adjuster.execute(() -> {
            System.out.println("调度调整核心线程数: " + executor.getCorePoolSize() + " -> " + newSize);
            executor.setCorePoolSize(newSize);
        });
    }
}
五、动态调整的实际应用场景与监控指标
不同调整策略的适用场景对比
| 调整策略 | 适用场景 | 核心指标 | 调整频率 | 实现复杂度 |
|---|---|---|---|---|
| 定时调度(日夜模式) | 可预测的周期性负载 | 时间触发 | 低(小时级) | 低 |
| 基于队列长度 | 任务积压敏感型系统 | 队列长度、活跃线程数 | 中(秒级) | 中 |
| 基于性能指标 | 高动态负载系统 | CPU 利用率、吞吐量、延迟 | 高(秒级以下) | 高 |
| 混合策略 | 复杂业务系统 | 多指标综合评估 | 可变 | 高 |
场景一:日夜负载差异大的系统
比如一个电商系统,白天用户活跃度高,晚上低:
java 代码解读复制代码import java.time.LocalTime;
import java.util.concurrent.*;
import java.util.concurrent.atomic.AtomicInteger;

public class DayNightThreadPoolAdjuster {

    private final ThreadPoolExecutor executor;
    private final ScheduledExecutorService scheduler;

    // 白天和夜间的核心线程数配置
    private final int daytimeCoreSize = 10;
    private final int nighttimeCoreSize = 3;

    public DayNightThreadPoolAdjuster() {
        // 创建主线程池
        this.executor = new ThreadPoolExecutor(
                nighttimeCoreSize, // 初始使用夜间配置
                20,
                60, TimeUnit.SECONDS,
                new LinkedBlockingQueue<>(500),
                new ThreadFactory() {
                    private final AtomicInteger counter = new AtomicInteger(1);
                    @Override
                    public Thread newThread(Runnable r) {
                        return new Thread(r, "业务线程-" + counter.getAndIncrement());
                    }
                });

        // 创建调度器
        this.scheduler = Executors.newScheduledThreadPool(1);

        // 启动自动调整任务
        startAutoAdjustment();
    }

    private void startAutoAdjustment() {
        // 每小时检查一次时间并调整
        scheduler.scheduleAtFixedRate(() -> {
            LocalTime now = LocalTime.now();
            int hour = now.getHour();

            // 判断是白天还是夜间 (假设8:00-22:00为白天)
            if (hour >= 8 && hour < 22) {
                if (executor.getCorePoolSize() != daytimeCoreSize) {
                    System.out.println("当前时间 " + now + ",切换到白天模式,核心线程数: " + daytimeCoreSize);
                    executor.setCorePoolSize(daytimeCoreSize);
                }
            } else {
                if (executor.getCorePoolSize() != nighttimeCoreSize) {
                    System.out.println("当前时间 " + now + ",切换到夜间模式,核心线程数: " + nighttimeCoreSize);
                    executor.setCorePoolSize(nighttimeCoreSize);
                }
            }
        }, 0, 1, TimeUnit.HOURS);
    }

    public ThreadPoolExecutor getExecutor() {
        return executor;
    }

    public void shutdown() {
        scheduler.shutdown();
        executor.shutdown();
    }

    // 示例使用
    public static void main(String[] args) throws InterruptedException {
        DayNightThreadPoolAdjuster adjuster = new DayNightThreadPoolAdjuster();
        ThreadPoolExecutor pool = adjuster.getExecutor();

        // 模拟提交任务
        for (int i = 0; i < 5; i++) {
            pool.submit(() -> {
                System.out.println(Thread.currentThread().getName() + " 执行任务");
                try {
                    Thread.sleep(1000);
                } catch (InterruptedException e) {
                    Thread.currentThread().interrupt();
                }
            });
        }

        // 等待一段时间
        Thread.sleep(5000);

        // 关闭
        adjuster.shutdown();
    }
}
场景二:基于全面监控指标的自适应调整
实际生产环境中,我们应该结合更丰富的监控指标来动态调整线程池参数:
java 代码解读复制代码import java.lang.management.ManagementFactory;
import java.lang.management.OperatingSystemMXBean;
import java.util.concurrent.*;
import java.util.concurrent.atomic.AtomicInteger;

public class EnhancedAdaptiveThreadPool {

    private final ThreadPoolExecutor executor;
    private final ScheduledExecutorService monitor;

    // 线程池配置参数
    private final int minCoreSize = 2;
    private final int maxCoreSize;
    private final int queueSizeThreshold = 20; // 队列长度阈值

    // 任务性能跟踪
    private final ConcurrentHashMap taskStartTimes = new ConcurrentHashMap<>();
    private final AtomicInteger totalTasks = new AtomicInteger(0);
    private final AtomicInteger completedTasks = new AtomicInteger(0);
    private double avgProcessingTime = 0;

    public EnhancedAdaptiveThreadPool() {
        // 根据CPU核心数确定最大核心线程数
        int cpuCores = Runtime.getRuntime().availableProcessors();
        this.maxCoreSize = cpuCores * 2; // 一般建议线程数为CPU核心数的1-2倍

        System.out.println("系统CPU核心数:" + cpuCores + ", 设置最大核心线程数:" + maxCoreSize);

        // 创建主线程池
        this.executor = new ThreadPoolExecutor(
                minCoreSize,
                maxCoreSize * 2, // 最大线程数设为核心线程数的2倍
                60, TimeUnit.SECONDS,
                new LinkedBlockingQueue<>(100),
                new CustomThreadFactory("自适应线程"),
                new ThreadPoolExecutor.CallerRunsPolicy());

        // 创建监控线程
        this.monitor = Executors.newScheduledThreadPool(1);

        // 启动自动调整
        startMonitoring();
    }

    private static class CustomThreadFactory implements ThreadFactory {
        private final AtomicInteger counter = new AtomicInteger(1);
        private final String prefix;

        public CustomThreadFactory(String prefix) {
            this.prefix = prefix;
        }

        @Override
        public Thread newThread(Runnable r) {
            Thread thread = new Thread(r, prefix + "-" + counter.getAndIncrement());
            // 设置为非守护线程
            thread.setDaemon(false);
            // 设置为正常优先级
            thread.setPriority(Thread.NORM_PRIORITY);
            return thread;
        }
    }

    public  Future submit(Callable task) {
        // 包装任务以跟踪性能
        return executor.submit(new Callable() {
            @Override
            public T call() throws Exception {
                long startTime = System.currentTimeMillis();
                long threadId = Thread.currentThread().getId();
                taskStartTimes.put(threadId, startTime);
                totalTasks.incrementAndGet();

                try {
                    return task.call();
                } finally {
                    long endTime = System.currentTimeMillis();
                    taskStartTimes.remove(threadId);
                    completedTasks.incrementAndGet();

                    // 更新平均处理时间(简单滑动平均)
                    double processingTime = endTime - startTime;
                    avgProcessingTime = (avgProcessingTime * 0.8) + (processingTime * 0.2);
                }
            }
        });
    }

    private void startMonitoring() {
        // 每5秒检查一次负载并调整
        monitor.scheduleAtFixedRate(() -> {
            // 获取线程池指标
            int queueSize = executor.getQueue().size();
            int currentCoreSize = executor.getCorePoolSize();
            int activeThreads = executor.getActiveCount();
            int poolSize = executor.getPoolSize();

            // 获取系统CPU使用率
            double cpuLoad = getSystemCpuLoad();

            // 任务吞吐量计算
            int completed = completedTasks.get();
            double throughput = completed / 5.0; // 每秒完成任务数

            // 重置计数器
            completedTasks.set(0);

            System.out.println("== 监控报告 ==");
            System.out.println("CPU使用率: " + String.format("%.2f", cpuLoad * 100) + "%");
            System.out.println("队列长度: " + queueSize);
            System.out.println("当前核心线程数: " + currentCoreSize);
            System.out.println("当前线程池大小: " + poolSize);
            System.out.println("活跃线程数: " + activeThreads);
            System.out.println("任务吞吐量: " + String.format("%.2f", throughput) + "任务/秒");
            System.out.println("平均处理时间: " + String.format("%.2f", avgProcessingTime) + "ms");

            // 计算理想线程数
            // Little's Law: 并发数 = 吞吐量 × 响应时间
            int idealThreadCount = Math.max(minCoreSize, (int) Math.ceil(throughput * (avgProcessingTime / 1000.0)));
            idealThreadCount = Math.min(idealThreadCount, maxCoreSize);

            // 基于多种指标综合决策
            boolean highLoad = queueSize > queueSizeThreshold ||
                              (activeThreads >= currentCoreSize * 0.8) ||
                              (cpuLoad < 0.7 && throughput > currentCoreSize);

            boolean lowLoad = queueSize == 0 &&
                             activeThreads < currentCoreSize * 0.3 &&
                             currentCoreSize > minCoreSize &&
                             cpuLoad < 0.3;

            if (highLoad) {
                // 负载高,需要增加核心线程
                int newCoreSize = Math.min(currentCoreSize + 1, maxCoreSize);
                if (newCoreSize > currentCoreSize) {
                    System.out.println("⚠️ 检测到高负载,增加核心线程数: " + currentCoreSize + " -> " + newCoreSize);
                    executor.setCorePoolSize(newCoreSize);
                }
            } else if (lowLoad) {
                // 负载低,可以减少核心线程
                int newCoreSize = Math.max(currentCoreSize - 1, minCoreSize);
                if (newCoreSize < currentCoreSize) {
                    System.out.println("⚠️ 检测到低负载,减少核心线程数: " + currentCoreSize + " -> " + newCoreSize);
                    executor.setCorePoolSize(newCoreSize);
                }
            } else if (Math.abs(currentCoreSize - idealThreadCount) > 2) {
                // 根据Little's Law调整到理想线程数
                System.out.println("⚠️ 根据性能指标调整,核心线程数: " + currentCoreSize + " -> " + idealThreadCount);
                executor.setCorePoolSize(idealThreadCount);
            }
        }, 5, 5, TimeUnit.SECONDS);
    }

    private double getSystemCpuLoad() {
        OperatingSystemMXBean osBean = ManagementFactory.getOperatingSystemMXBean();
        // 这里使用系统平均负载作为参考
        // 在生产环境中,可以使用JMX或其他方法获取更精确的CPU使用率
        double loadAvg = osBean.getSystemLoadAverage();
        if (loadAvg < 0) return 0.5; // 某些系统可能不支持此方法
        return Math.min(loadAvg / Runtime.getRuntime().availableProcessors(), 1.0);
    }

    public ThreadPoolExecutor getExecutor() {
        return executor;
    }

    public void shutdown() {
        monitor.shutdown();
        executor.shutdown();
    }
}
这个增强版的自适应线程池考虑了更多实际生产环境中的指标:
- CPU 使用率
- 任务处理的平均时间
- 任务吞吐量
- 使用 Little's Law(并发数 = 吞吐量 × 响应时间)计算理想线程数
- 结合 CPU 核心数动态调整线程池大小
六、修改核心线程数的注意事项
动态调整核心线程数虽然强大,但也需要注意一些问题:
1. 增减核心线程数的不对称性
- 增加核心线程数:如果等待队列有任务,线程池会立即创建新的核心线程来处理这些任务
- 减少核心线程数:默认情况下(
allowCoreThreadTimeOut=false),核心线程不会因空闲而被回收,即使核心线程数被调低。只有设置allowCoreThreadTimeOut(true)后,多余的核心线程才会在空闲超过 keepAliveTime 后被回收。
2. 对系统资源的影响
调整核心线程数会直接影响系统资源使用:
- 增加核心线程数会占用更多内存和 CPU 资源
- 核心线程通常是常驻的,即使没有任务也会保持活跃
- 在高并发环境下,过多的线程可能导致线程上下文切换增加,反而降低性能
3. 线程池参数的整体调优
动态修改核心线程数应该与其他线程池参数协调配合:
-
keepAliveTime:当设置
allowCoreThreadTimeOut(true)时,这个参数决定了空闲核心线程的存活时间。如果频繁调整核心线程数,可以设置较短的 keepAliveTime 避免资源浪费;而在负载稳定的场景,可以设置较长的 keepAliveTime 减少线程创建销毁的开销。 -
队列容量:过小的队列会导致频繁创建非核心线程,过大的队列可能导致任务积压。对于波动较大的负载,可以设置较小的队列配合动态调整核心线程数。
-
拒绝策略:在极端负载下,即使动态调整了核心线程数,任务仍可能被拒绝。可以自定义拒绝策略,例如记录日志、放入备用队列或异步重试,避免任务丢失。
java 代码解读复制代码// 自定义拒绝策略示例
ThreadPoolExecutor executor = new ThreadPoolExecutor(
    5, 10, 60, TimeUnit.SECONDS,
    new ArrayBlockingQueue<>(100),
    Executors.defaultThreadFactory(),
    new RejectedExecutionHandler() {
        @Override
        public void rejectedExecution(Runnable r, ThreadPoolExecutor e) {
            System.err.println("任务被拒绝,当前队列长度:" + e.getQueue().size());
            // 可以将任务放入备用存储(如Redis)或日志系统
            // 也可以在低峰期重新提交
            // Redis示例代码省略
        }
    }
);
七、真实业务场景实战
模拟电商秒杀场景的线程池动态调整
java 代码解读复制代码import java.time.LocalDateTime;
import java.time.format.DateTimeFormatter;
import java.util.Random;
import java.util.concurrent.*;
import java.util.concurrent.atomic.AtomicInteger;

public class SecKillThreadPoolDemo {

    private static class SecKillTask implements Runnable {
        private final int userId;
        private final int productId;
        private static final Random random = new Random();

        public SecKillTask(int userId, int productId) {
            this.userId = userId;
            this.productId = productId;
        }

        @Override
        public void run() {
            String time = LocalDateTime.now().format(DateTimeFormatter.ofPattern("HH:mm:ss.SSS"));
            try {
                // 模拟处理秒杀请求
                Thread.sleep(200 + random.nextInt(300));
                System.out.println(time + " - " + Thread.currentThread().getName()
                        + " 处理用户" + userId + "的秒杀请求,商品ID: " + productId);
            } catch (InterruptedException e) {
                Thread.currentThread().interrupt();
            }
        }
    }

    public static void main(String[] args) throws InterruptedException {
        // 创建秒杀处理线程池,初始核心线程数较小
        ThreadPoolExecutor secKillPool = new ThreadPoolExecutor(
                3,  // 初始核心线程数
                20, // 最大线程数
                60, TimeUnit.SECONDS,
                new ArrayBlockingQueue<>(500), // 使用有界队列,避免任务积压导致OOM
                new ThreadFactory() {
                    private final AtomicInteger counter = new AtomicInteger(1);
                    @Override
                    public Thread newThread(Runnable r) {
                        return new Thread(r, "秒杀线程-" + counter.getAndIncrement());
                    }
                },
                new RejectedExecutionHandler() {
                    @Override
                    public void rejectedExecution(Runnable r, ThreadPoolExecutor executor) {
                        // 自定义拒绝策略,记录被拒绝的请求并返回秒杀失败
                        if (r instanceof SecKillTask) {
                            SecKillTask task = (SecKillTask) r;
                            System.err.println("⚠️ 系统繁忙,用户" + task.userId + "秒杀请求被拒绝");
                            // 实际场景中可以:
                            // 1. 返回特定的失败信息给用户
                            // 2. 将请求存入备用存储(如Redis)
                            // 3. 记录监控指标,触发容量扩展
                        }
                    }
                });

        // 允许核心线程超时回收,提高资源利用率
        secKillPool.allowCoreThreadTimeOut(true);

        // 模拟秒杀活动监控与调整
        ScheduledExecutorService monitor = Executors.newScheduledThreadPool(1);

        // 用于模拟请求量的计数器
        AtomicInteger requestCounter = new AtomicInteger(0);
        AtomicInteger totalRequestsLastMinute = new AtomicInteger(0);

        // 每10秒评估一次负载并调整线程池
        monitor.scheduleAtFixedRate(() -> {
            int requests = requestCounter.getAndSet(0);
            totalRequestsLastMinute.addAndGet(requests);

            int currentCoreSize = secKillPool.getCorePoolSize();
            int queueSize = secKillPool.getQueue().size();
            int activeThreads = secKillPool.getActiveCount();
            int completedTasks = (int)secKillPool.getCompletedTaskCount();

            System.out.println("\n----- 监控报告 -----");
            System.out.println("过去10秒收到请求: " + requests);
            System.out.println("队列积压任务数: " + queueSize);
            System.out.println("当前核心线程数: " + currentCoreSize);
            System.out.println("当前活跃线程数: " + activeThreads);
            System.out.println("已完成任务数: " + completedTasks);

            // 根据多种指标综合决策调整核心线程数
            // 1. 请求量趋势
            // 2. 队列积压情况
            // 3. 线程利用率(活跃线程/核心线程)
            boolean highLoad = requests > 100 ||
                               queueSize > 50 ||
                               activeThreads >= currentCoreSize * 0.8;

            boolean lowLoad = requests < 20 &&
                              queueSize < 10 &&
                              activeThreads < currentCoreSize * 0.3 &&
                              currentCoreSize > 3;

            if (highLoad) {
                // 高负载情况 - 动态计算理想核心线程数
                // 简单公式:每10个请求/秒对应1个线程(假设每个请求平均处理时间200ms)
                int idealThreads = Math.max(3, requests / 10);
                int newCoreSize = Math.min(Math.min(idealThreads, 15),
                                         secKillPool.getMaximumPoolSize());

                if (newCoreSize > currentCoreSize) {
                    System.out.println("⚠️ 检测到高负载,增加核心线程数: " + currentCoreSize + " -> " + newCoreSize);
                    secKillPool.setCorePoolSize(newCoreSize);

                    // 预热新增的核心线程,提前准备处理请求
                    secKillPool.prestartAllCoreThreads();
                }
            } else if (lowLoad) {
                // 低负载情况 - 缓慢释放资源
                int newCoreSize = Math.max(currentCoreSize - 1, 3);
                if (newCoreSize < currentCoreSize) {
                    System.out.println("⚠️ 检测到低负载,减少核心线程数: " + currentCoreSize + " -> " + newCoreSize);
                    secKillPool.setCorePoolSize(newCoreSize);
                }
            }
        }, 10, 10, TimeUnit.SECONDS);

        // 每5分钟重置计数器
        monitor.scheduleAtFixedRate(() -> {
            int totalRequests = totalRequestsLastMinute.getAndSet(0);
            System.out.println("\n===== 过去5分钟总请求量: " + totalRequests + " =====");
        }, 5, 5, TimeUnit.MINUTES);

        // 模拟秒杀活动波动请求
        ScheduledExecutorService secKillSimulator = Executors.newScheduledThreadPool(1);

        // 模拟正常请求
        secKillSimulator.scheduleAtFixedRate(() -> {
            // 每秒钟产生2-5个请求
            int requestsPerSecond = 2 + new Random().nextInt(4);
            for (int i = 0; i < requestsPerSecond; i++) {
                int userId = 10000 + new Random().nextInt(9000);
                secKillPool.execute(new SecKillTask(userId, 1001));
                requestCounter.incrementAndGet();
            }
        }, 0, 1, TimeUnit.SECONDS);

        // 模拟秒杀活动开始 - 突发大量请求
        Thread.sleep(30000); // 30秒后开始秒杀
        System.out.println("\n\n!!!!! 秒杀活动开始 !!!!!\n\n");

        // 提交大量请求模拟秒杀场景
        for (int i = 0; i < 3; i++) {
            // 模拟3轮高峰
            CompletableFuture.runAsync(() -> {
                try {
                    // 模拟10秒内涌入200个请求
                    for (int j = 0; j < 200; j++) {
                        int userId = 20000 + new Random().nextInt(10000);
                        secKillPool.execute(new SecKillTask(userId, 1001));
                        requestCounter.incrementAndGet();
                        Thread.sleep(50); // 每50ms一个请求
                    }
                } catch (Exception e) {
                    e.printStackTrace();
                }
            });

            Thread.sleep(20000); // 每轮高峰间隔20秒
        }

        // 运行一段时间后结束
        Thread.sleep(60000);

        // 关闭所有线程池
        secKillSimulator.shutdown();
        monitor.shutdown();
        secKillPool.shutdown();
        System.out.println("演示结束");
    }
}
这个案例不仅模拟了电商秒杀场景下的线程池动态调整,还强调了:
- 使用有界队列避免 OOM
- 自定义拒绝策略处理极端情况
- 允许核心线程超时回收提高资源利用率
- 基于多种指标综合决策调整核心线程数
- 在负载高峰前预热线程池
八、进阶:线程工厂选项与线程池监控
更简洁的线程工厂实现
在前面的例子中,我们都是手动实现 ThreadFactory。如果使用 Guava 库,可以更简洁地创建线程工厂:
java 代码解读复制代码// 使用Guava的ThreadFactoryBuilder(需引入依赖)
import com.google.common.util.concurrent.ThreadFactoryBuilder;

ThreadFactory factory = new ThreadFactoryBuilder()
    .setNameFormat("业务线程-%d")
    .setDaemon(false)
    .setPriority(Thread.NORM_PRIORITY)
    .setUncaughtExceptionHandler((t, e) -> {
        System.err.println("线程" + t.getName() + "发生未捕获异常: " + e.getMessage());
        e.printStackTrace();
    })
    .build();

ThreadPoolExecutor executor = new ThreadPoolExecutor(
    5, 10, 60, TimeUnit.SECONDS,
    new LinkedBlockingQueue<>(100),
    factory);
线程池监控与 JMX 集成
在生产环境中,可以通过 JMX 监控线程池状态,方便运维人员查看和调整:
java 代码解读复制代码import javax.management.*;
import java.lang.management.ManagementFactory;
import java.util.concurrent.*;

public class JmxMonitorableThreadPool {
    public static class ThreadPoolMonitor implements DynamicMBean {
        private final ThreadPoolExecutor executor;

        public ThreadPoolMonitor(ThreadPoolExecutor executor) {
            this.executor = executor;
        }

        @Override
        public Object getAttribute(String attribute) throws AttributeNotFoundException,
                MBeanException, ReflectionException {
            switch (attribute) {
                case "CorePoolSize": return executor.getCorePoolSize();
                case "MaximumPoolSize": return executor.getMaximumPoolSize();
                case "ActiveThreadCount": return executor.getActiveCount();
                case "PoolSize": return executor.getPoolSize();
                case "QueueSize": return executor.getQueue().size();
                case "CompletedTaskCount": return executor.getCompletedTaskCount();
                case "TaskCount": return executor.getTaskCount();
                default: throw new AttributeNotFoundException("Unknown attribute: " + attribute);
            }
        }

        @Override
        public void setAttribute(Attribute attribute) throws AttributeNotFoundException,
                InvalidAttributeValueException, MBeanException, ReflectionException {
            String name = attribute.getName();
            Object value = attribute.getValue();

            if ("CorePoolSize".equals(name) && value instanceof Integer) {
                executor.setCorePoolSize((Integer) value);
            } else if ("MaximumPoolSize".equals(name) && value instanceof Integer) {
                executor.setMaximumPoolSize((Integer) value);
            } else {
                throw new AttributeNotFoundException("Attribute " + name + " not found or not writable");
            }
        }

        @Override
        public AttributeList getAttributes(String[] attributes) {
            AttributeList list = new AttributeList();
            for (String attribute : attributes) {
                try {
                    list.add(new Attribute(attribute, getAttribute(attribute)));
                } catch (Exception e) {
                    // 忽略无法获取的属性
                }
            }
            return list;
        }

        @Override
        public AttributeList setAttributes(AttributeList attributes) {
            AttributeList result = new AttributeList();
            for (Object o : attributes) {
                Attribute attr = (Attribute) o;
                try {
                    setAttribute(attr);
                    result.add(new Attribute(attr.getName(), getAttribute(attr.getName())));
                } catch (Exception e) {
                    // 忽略无法设置的属性
                }
            }
            return result;
        }

        @Override
        public Object invoke(String actionName, Object[] params, String[] signature)
                throws MBeanException, ReflectionException {
            if ("shutdown".equals(actionName) && (params == null || params.length == 0)) {
                executor.shutdown();
                return null;
            } else if ("shutdownNow".equals(actionName) && (params == null || params.length == 0)) {
                return executor.shutdownNow();
            } else if ("prestartAllCoreThreads".equals(actionName) && (params == null || params.length == 0)) {
                return executor.prestartAllCoreThreads();
            }
            throw new ReflectionException(new NoSuchMethodException(actionName));
        }

        @Override
        public MBeanInfo getMBeanInfo() {
            MBeanAttributeInfo[] attributes = new MBeanAttributeInfo[] {
                new MBeanAttributeInfo("CorePoolSize", "int", "核心线程数", true, true, false),
                new MBeanAttributeInfo("MaximumPoolSize", "int", "最大线程数", true, true, false),
                new MBeanAttributeInfo("ActiveThreadCount", "int", "活跃线程数", true, false, false),
                new MBeanAttributeInfo("PoolSize", "int", "当前线程池大小", true, false, false),
                new MBeanAttributeInfo("QueueSize", "int", "队列中等待任务数", true, false, false),
                new MBeanAttributeInfo("CompletedTaskCount", "long", "已完成任务数", true, false, false),
                new MBeanAttributeInfo("TaskCount", "long", "总任务数", true, false, false),
            };

            MBeanOperationInfo[] operations = new MBeanOperationInfo[] {
                new MBeanOperationInfo("shutdown", "关闭线程池", null, "void", MBeanOperationInfo.ACTION),
                new MBeanOperationInfo("shutdownNow", "立即关闭线程池", null, "java.util.List", MBeanOperationInfo.ACTION),
                new MBeanOperationInfo("prestartAllCoreThreads", "预启动所有核心线程", null, "int", MBeanOperationInfo.ACTION),
            };

            return new MBeanInfo(
                getClass().getName(),
                "线程池监控和管理",
                attributes,
                null,  // 构造函数
                operations,
                null); // 通知
        }
    }

    public static ThreadPoolExecutor createMonitoredThreadPool(
            String poolName, int coreSize, int maxSize, int queueCapacity) throws Exception {

        ThreadPoolExecutor executor = new ThreadPoolExecutor(
                coreSize, maxSize,
                60, TimeUnit.SECONDS,
                new LinkedBlockingQueue<>(queueCapacity));

        // 注册MBean
        MBeanServer mbs = ManagementFactory.getPlatformMBeanServer();
        ObjectName name = new ObjectName("com.example:type=ThreadPool,name=" + poolName);

        ThreadPoolMonitor monitor = new ThreadPoolMonitor(executor);
        mbs.registerMBean(monitor, name);

        System.out.println("线程池 " + poolName + " 已创建并注册到JMX");
        return executor;
    }

    // 使用示例
    public static void main(String[] args) throws Exception {
        ThreadPoolExecutor executor = createMonitoredThreadPool("业务线程池", 5, 10, 100);

        // 提交一些任务测试
        for (int i = 0; i < 20; i++) {
            final int taskId = i;
            executor.submit(() -> {
                try {
                    System.out.println("执行任务: " + taskId);
                    Thread.sleep(1000);
                } catch (InterruptedException e) {
                    Thread.currentThread().interrupt();
                }
                return taskId;
            });
        }

        // 此时可以通过JMX客户端(如JConsole或VisualVM)连接并查看/修改线程池参数
        System.out.println("线程池已启动,可通过JMX客户端(如JConsole)连接查看");
        System.out.println("按Enter键退出");
        System.in.read();

        executor.shutdown();
    }
}
通过 JMX,我们可以:
- 实时监控线程池状态
- 动态调整核心线程数和最大线程数
- 执行关闭等操作
- 集成到监控系统(如 Prometheus、Grafana)实现自动化监控和告警
九、总结
下面用表格总结一下关于 Java 线程池核心线程数动态调整的要点:
| 要点 | 说明 |
|---|---|
| 是否支持运行时修改 | 是,ThreadPoolExecutor 支持通过 setCorePoolSize()方法动态修改 |
| 增加核心线程数的生效时机 | 如队列中有等待任务,会立即创建新线程;否则等新任务到来时创建 |
| 减少核心线程数的生效时机 | 默认情况下核心线程不会被终止;设置 allowCoreThreadTimeOut(true)后,多余线程在空闲超时后被回收 |
| 线程池状态影响 | RUNNING 状态可完全调整;SHUTDOWN 状态可调整但不会创建新线程;STOP 及之后的状态调整无效 |
| prestartAllCoreThreads 作用 | 预启动所有核心线程,减少任务首次执行延迟;调整核心线程数后可立即创建新增线程 |
| 队列类型影响 | 无界队列导致 maximumPoolSize 失效;有界队列与核心线程数共同控制并发 |
| 线程安全性 | setCorePoolSize 本身线程安全,但并发调整建议通过同步机制或单线程调度器控制 |
| 应用场景 | 日夜负载差异大的系统、流量有波峰的系统、需要自适应调整的系统 |
| 调整决策依据 | 队列长度、活跃线程数、CPU 利用率、任务吞吐量、平均处理时间 |
| 监控方式 | JMX、Micrometer、Prometheus 等监控框架,结合自定义指标 |
| 调优建议 | 结合 keepAliveTime、队列容量、拒绝策略整体调优;避免频繁调整导致线程创建销毁开销 |
线程池核心线程数的动态调整是 Java 并发编程中的一个强大特性,合理使用可以让系统更好地适应负载变化,提高资源利用率和系统吞吐量。掌握这项技术,能让你的系统在面对不同负载时更加灵活高效!
感谢您耐心阅读到这里!如果觉得本文对您有帮助,欢迎点赞 👍、收藏 ⭐、分享给需要的朋友,您的支持是我持续输出技术干货的最大动力!
如果想获取更多 Java 技术深度解析,欢迎点击头像关注我,后续会每日更新高质量技术文章,陪您一起进阶成长~
评论记录:
回复评论: